        // 객체
        // 유무형의 모든 사물
        // 내장객체, 사용자 정의 객체
        // 브라우져 객체(BOM)
        // 문서객체(DOM) -> 태그들( <p> , <div> 등 )


        result = arr1.slice(1,3); 의
        slice 는 데이터의 변화를 감지하는 것에 사용됨
        프론트에서 아주 중요하게 쓰임!
- 배열
        let arr1 = ["공덕", "등촌", "대곡"];
        let arr2 = ["신반포", "염창", "수서"];

        result = arr1.splice(2, 1);  // 데이터를 삭제하는 것 (시작인덱스, 몇개 삭제할지 갯수)
        console.log(result); //대곡

        result = arr2.pop();  // 마지막 데이터를 읽어온다 (삭제)
        console.log(result);
        console.log(arr2); // 마지막 값만 삭제하고 남김

        result = arr2.shift();  // 맨 앞쪽 값을 읽어온다 (삭제)
        console.log(result);
        console.log(arr2);  // 맨 앞쪽 값만 남기고 나머지 삭제

        arr1.push(result);  // 배열의 맨 뒤쪽에 삽입
        console.log(arr1);

        arr1.unshift(result);  // 배열의 맨 앞쪽에 삽입
        console.log(arr1);

- 문자열 객체
        // 문자열 객체
        // 인덱스 번호가 존재
        // chatAt(), indexof(), substring()
        // length

        // let str = "hong"; // 이렇게 써도 됨, 실제 이렇게 씀
        // let str = new String("hong"); // 자바스크립트에서 문자열을 쓰는 정석

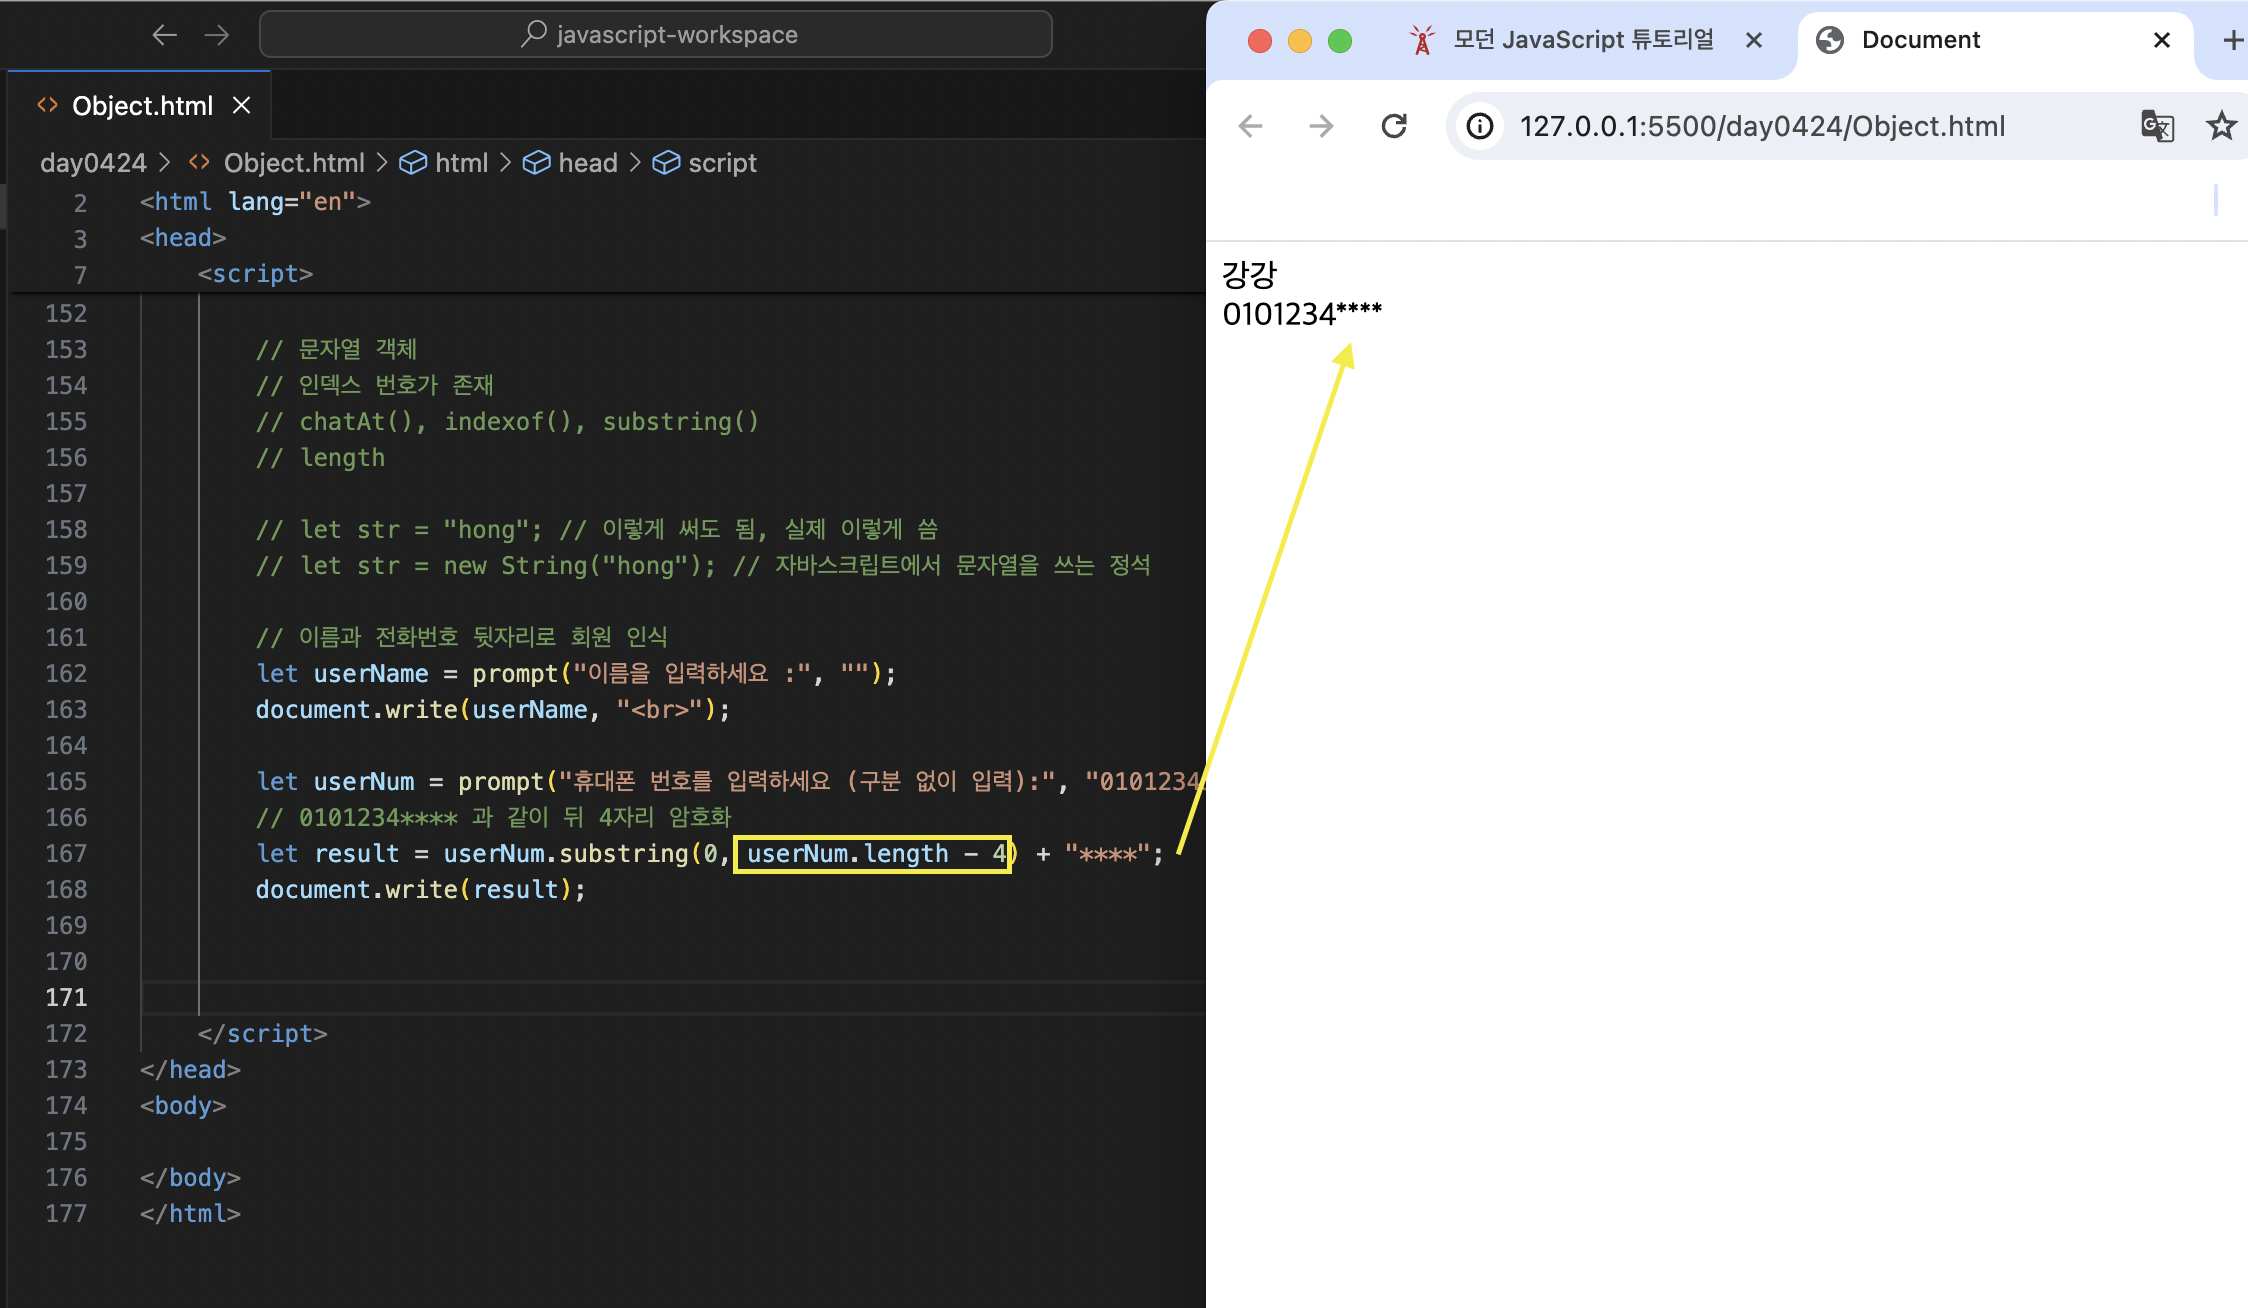
        // 이름과 전화번호받고 전화번호 뒷자리 4개 암호화
        let userName = prompt("이름을 입력하세요 :", "");
        document.write(userName, "<br>");

        let userNum = prompt("휴대폰 번호를 입력하세요 (구분 없이 입력):", "01012345678");
        // 0101234**** 과 같이 뒤 4자리 암호화
        let result = userNum.substring(0, userNum.length - 4) + "****";
        document.write(result);
- 메일의 유효성 검증하는 프로그램
        // 메일의 유효성 검증하는 프로그램 만들기

        let userEmail = prompt("이메일 주소 :", "");

        let arrUrl = [".co.kr", ".com", ".net", ".or.kr", ".go.kr"];
        // userEmail 에서 getElementById 로 @ 이전의 아이디를 가져오기  -> chk1
        // 그 다음 나머지 글자들에서 arrUlr 안에 있는 url이 있는지 보기 위해 for문을 돌리기  -> chk2

        let chk1 = false;  // @가 있는지 체크
        let chk2 = false;  // url 이 arrUlr 중 하나인지 체크

        // indexOf 를 사용
        // 아이디가 한 자 이상일 것이기 때문에 0 보다 커야한다.
        if (userEmail.indexOf('@') > 0) {
                chk1 = true;
        }

        for (let i = 0; i < arrUrl.length; i++) {
            if (userEmail.indexOf(arrUrl[i]) > 0) {
                chk2 = true;
            }
        }

        if(chk1 && chk2) {
            document.write(userEmail);
        } else {
            alert("이메일 형식이 부적합 합니다")
        }
- userEmail 에서 getElementById 로 @ 이전의 아이디를 가져오기
-> chk1
- 그 다음 나머지 글자들에서 arrUlr 안에 있는 url이 있는지 보기 위해 for문을 돌리기
-> chk2
접근은 맞았지만 식으로 나타내는 걸 잘 못했다.
그래도 비슷하게 접근을 했다는 게 좀 발전이 된 것 같다.
접근이 정말 중요한 듯! 코드는 어떻게든 연습하면 된다.
브라우저 객체 BOM
<script>
        // 브라우저 객체 BOM
        // 자바는 자바버츄얼이 컴파일을 해줬지만 자바스크립트는 스스로 컴파일을 할 수 있다.
        // '표준화에 대한 수용'
        // 브라우저 기능을 활용하는 용도

        // alert(), prompt(), confirm(), open(), close()
        // window.alert("hello");  // window 생략 가능

        window.open("문서, url", "새 창 이름(생략가능)", "창의 옵션(창의 위치와 크기 = 정보전달의 목적)"); // 새 창 열기
        // 부모창이 있어야 한다.
        // 부모창 <-> 자식창


        // 부모창과 자식창을 만들어 띄워보기
    </script>
window.open 를 이용해 부모창과 자식창을 만들어 띄워보기
// window.open("문서, url", "새 창 이름(생략가능)", "창의 옵션(창의 위치와 크기 = 정보전달의 목적)"); // 새 창 열기
// 부모창이 있어야 한다.
// window.close() -> self.close()
// 부모창 <-> 자식창
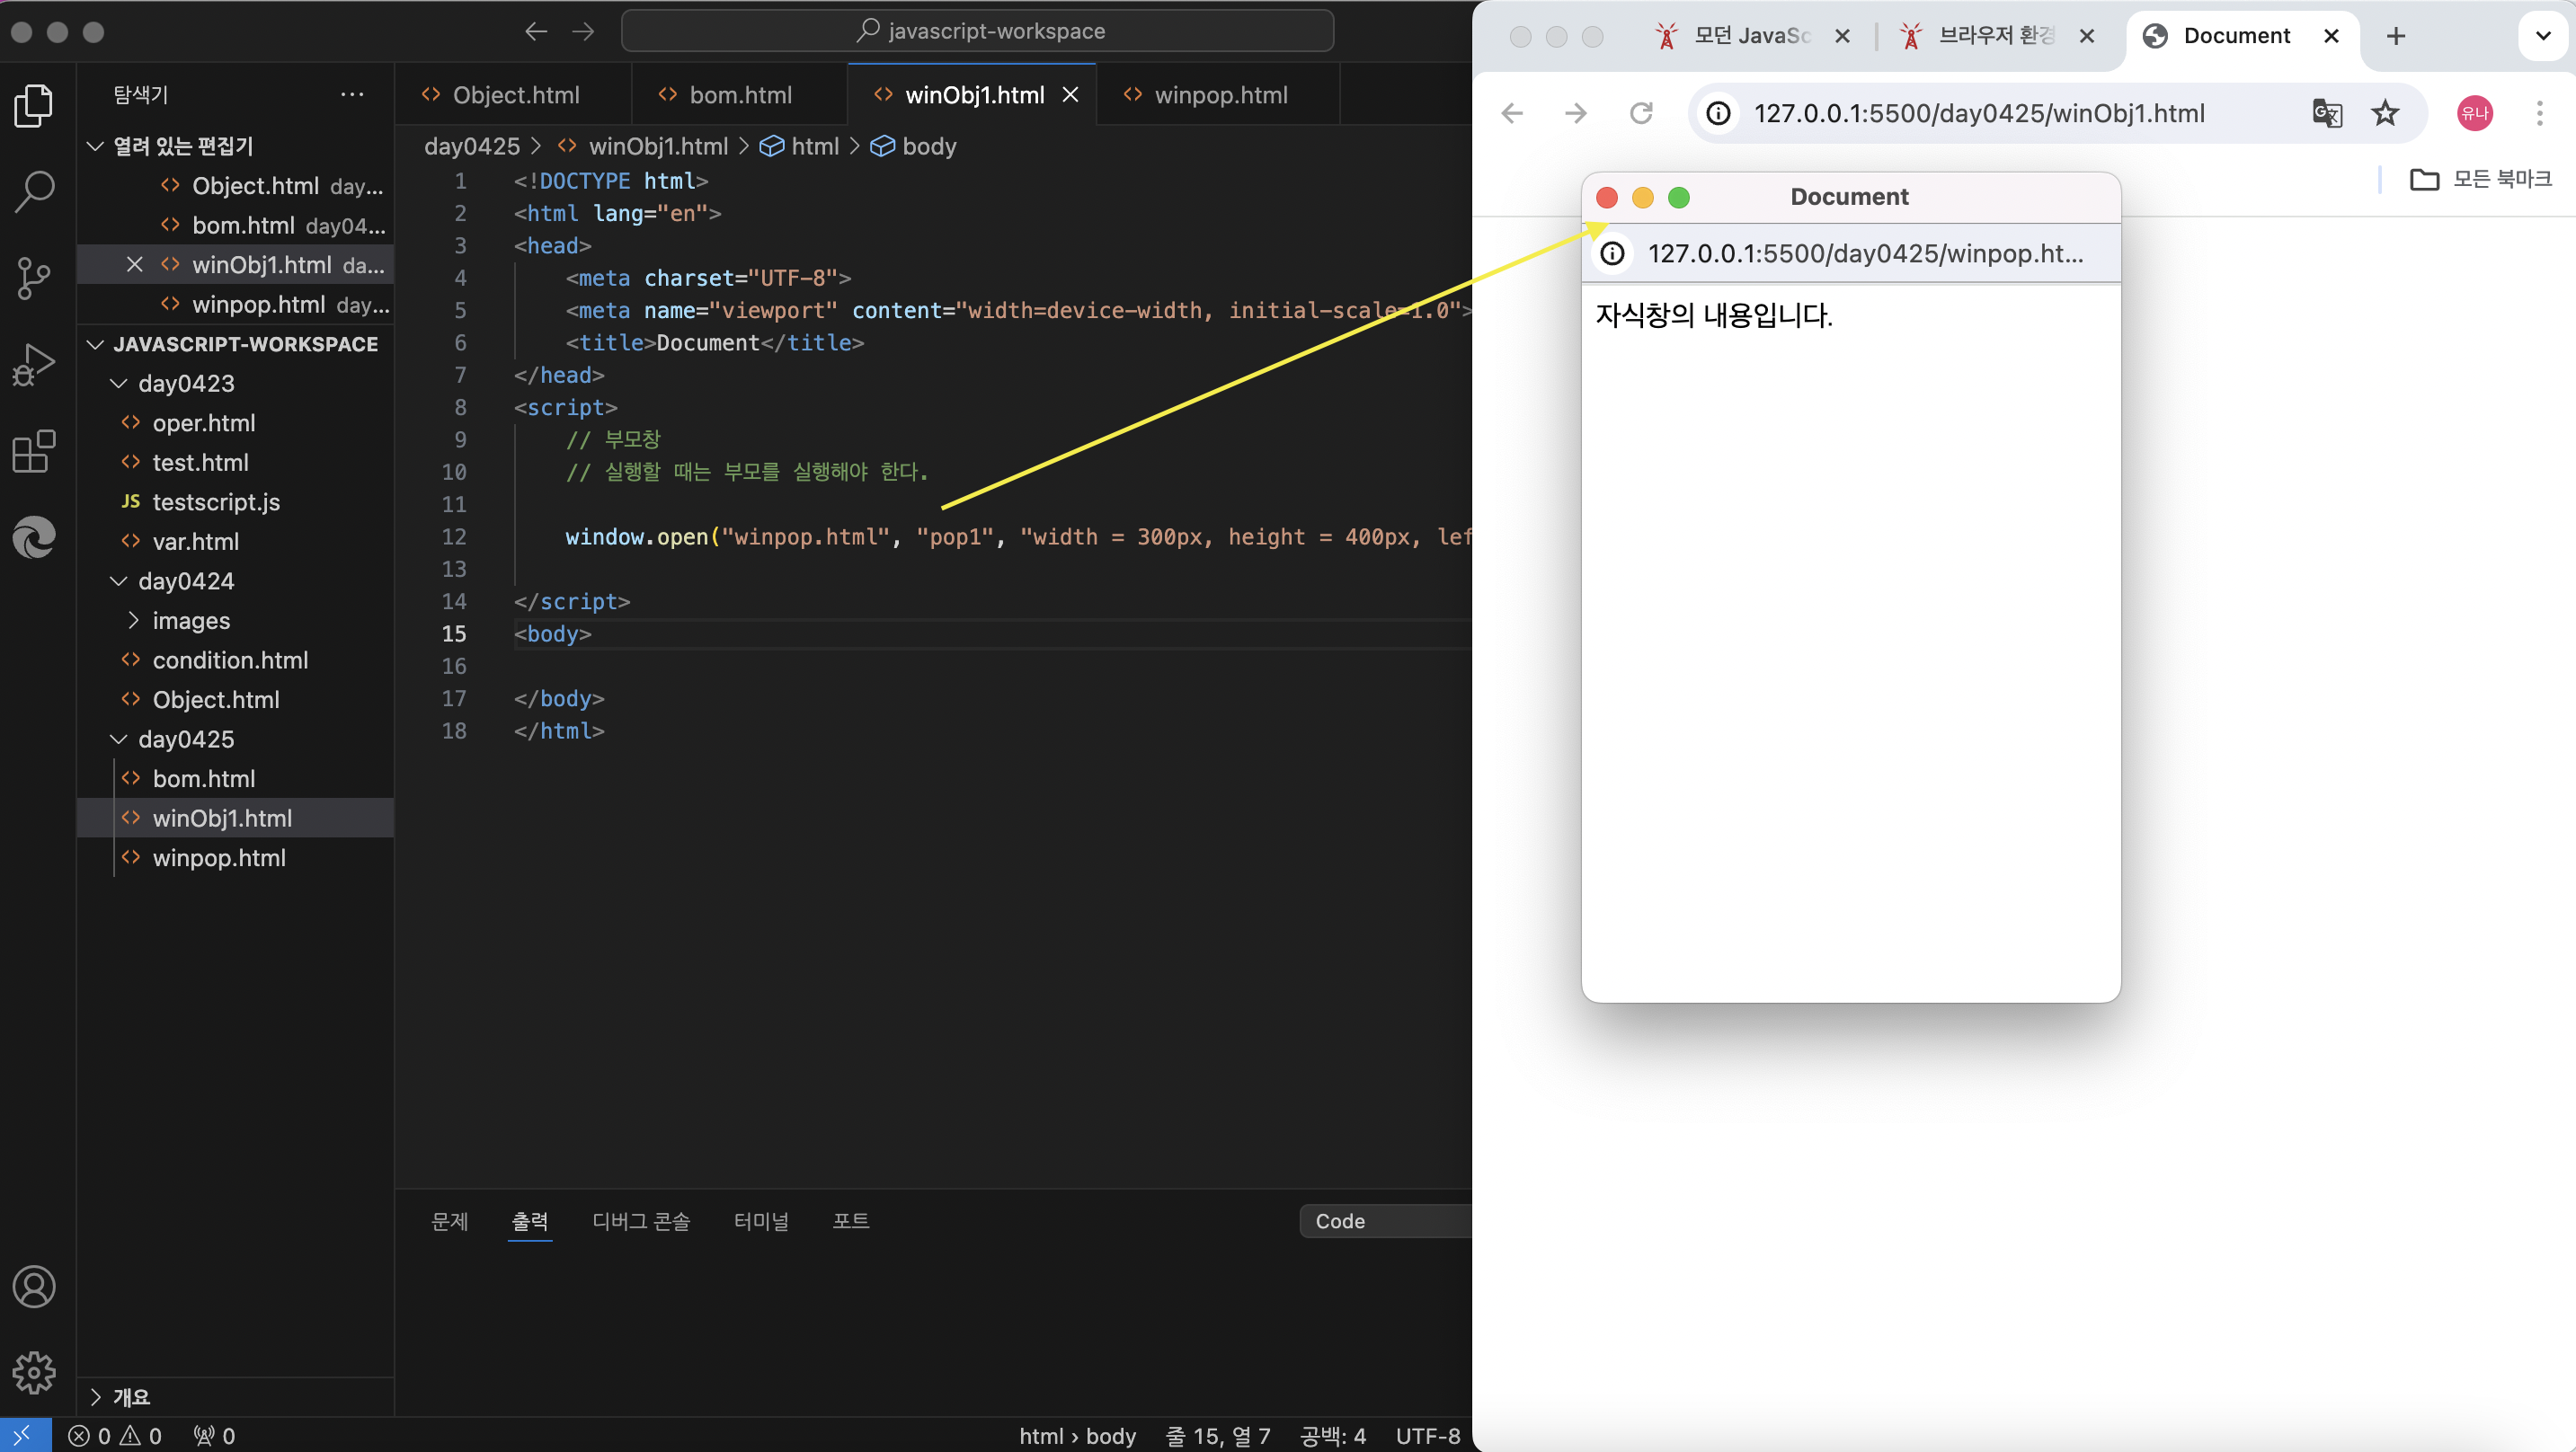
- 부모창 만들기
<script>
    // 부모창
    // 실행할 때는 부모를 실행해야 한다.

    window.open("winpop.html", "pop1", "width = 350px, height = 420px, left = 300px, top = 50px");

</script>
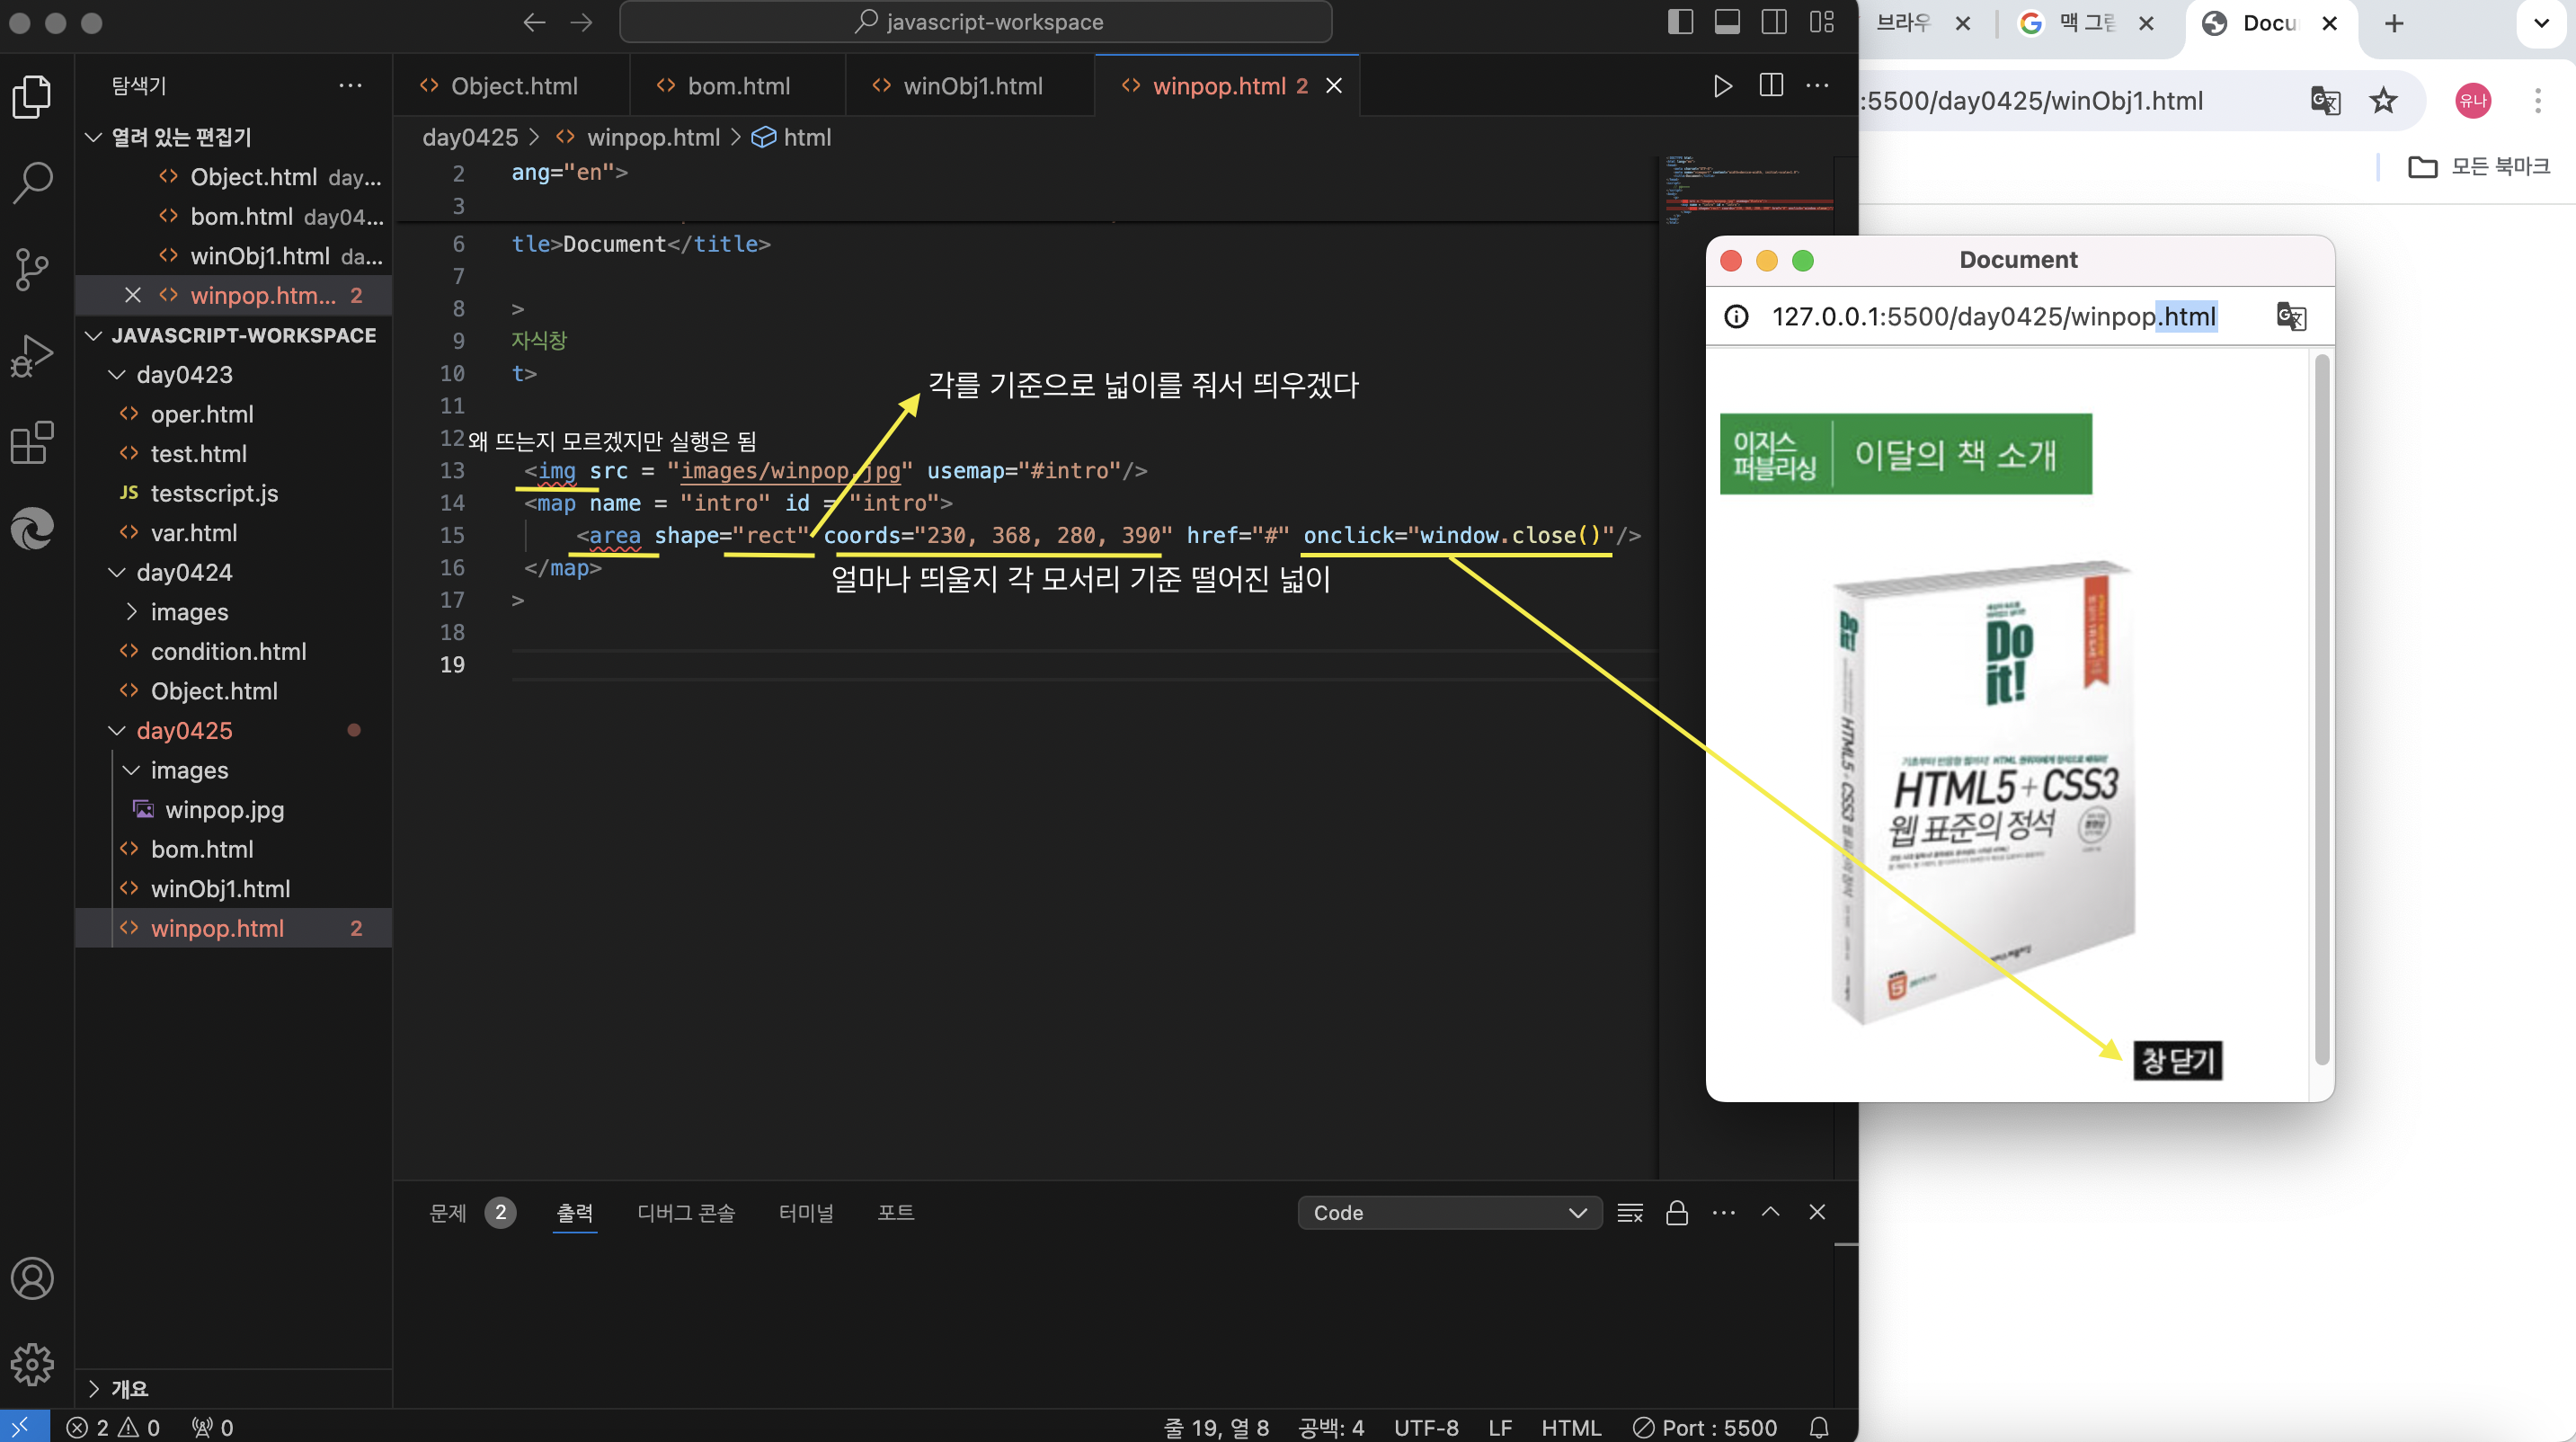
- 새로운 파일에서 작성된 자식창
<!DOCTYPE html>
<html lang="en">
<head>
    <meta charset="UTF-8">
    <meta name="viewport" content="width=device-width, initial-scale=1.0">
    <title>Document</title>
</head>
<body>
    <!-- 자식창 -->
    <p>
        <img src = "./images/winpop.jpg" usemap="#intro"/>
        <map name = "intro" id = "intro">
          <area shape="rect" coords="230, 368, 280, 390" href="#" onclick="window.close()"/>
        </map>
    </p>
</body>
</html>

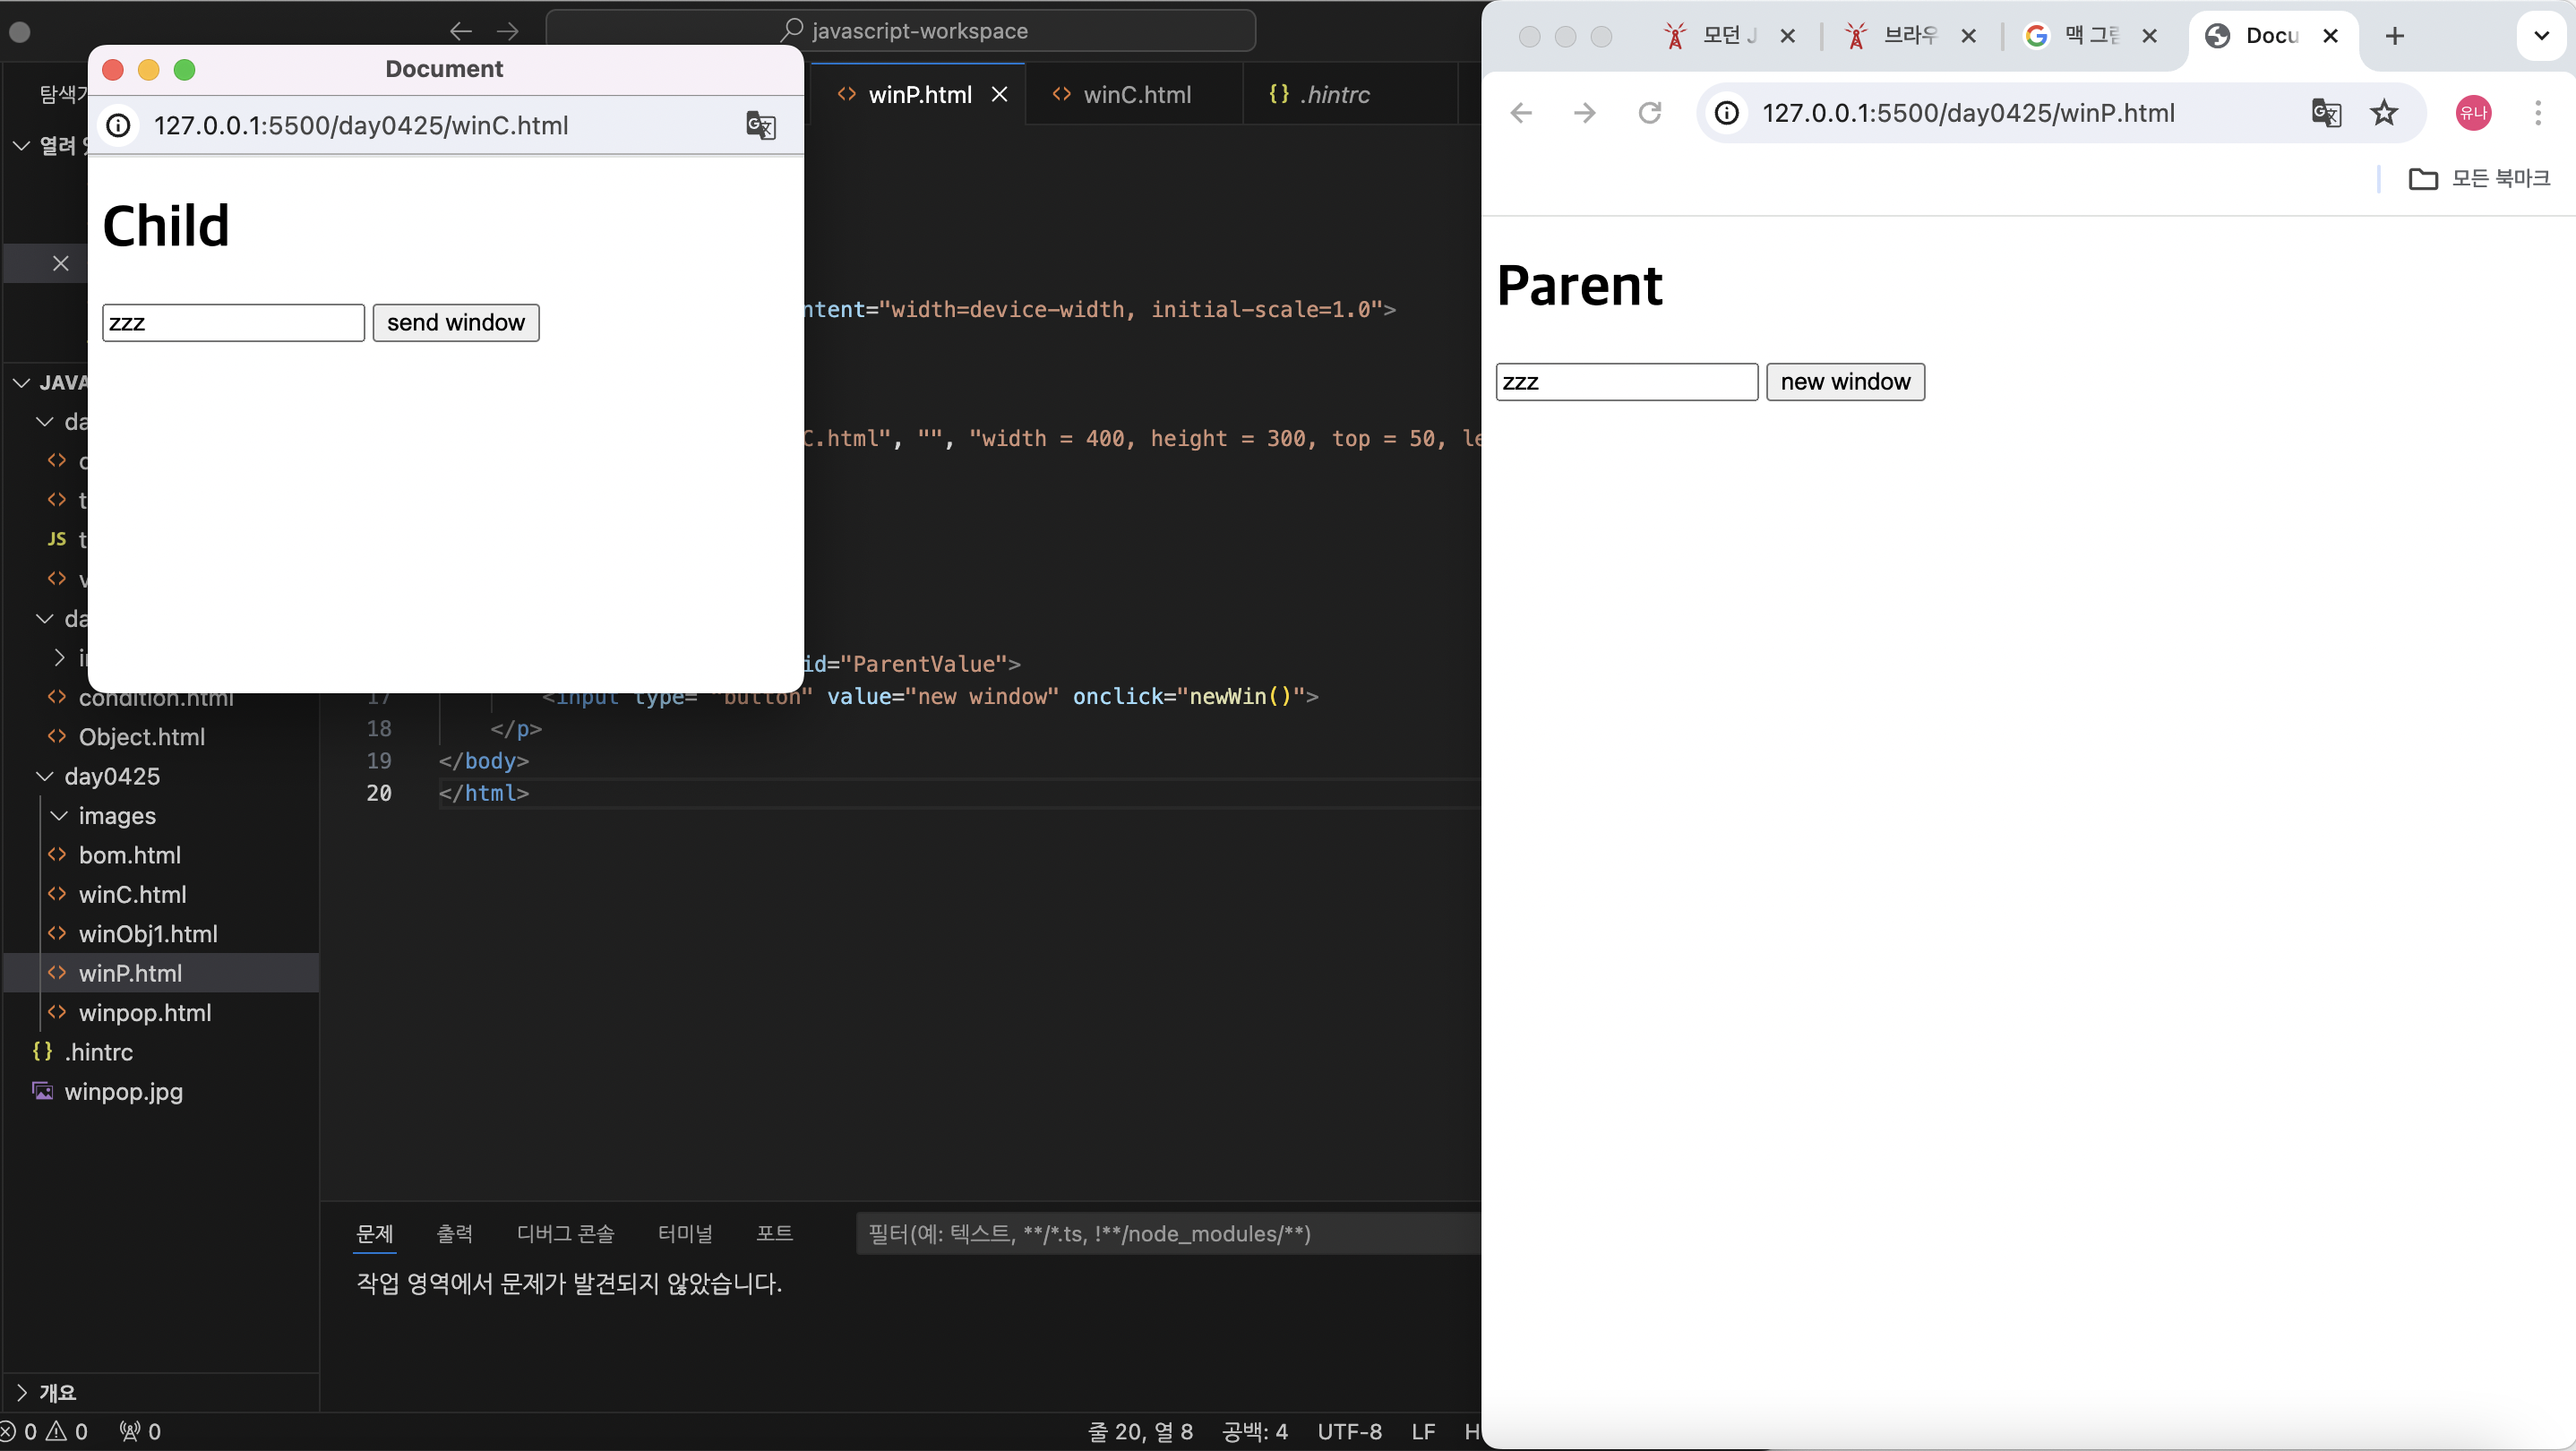
부모창과 자식창을 만들어 띄우고 서로 값을 주고 받을 수 있게 만들기
- 부모창
<!DOCTYPE html>
<html lang="en">
<head>
    <meta charset="UTF-8">
    <meta name="viewport" content="width=device-width, initial-scale=1.0">
    <title>Document</title>
    <script>
        function newWin() {
            window.open("winC.html", "", "width = 400, height = 300, top = 50, left = 50");
        }
    </script>
</head>
<body>
    <h1>Parent</h1>
    <p>
        <input type= "text" id="ParentValue">
        <input type= "button" value="new window" onclick="newWin()">
    </p>
</body>
</html>
- 자식창
<!DOCTYPE html>
<html lang="en">
<head>
    <meta charset="UTF-8">
    <meta name="viewport" content="width=device-width, initial-scale=1.0">
    <title>Document</title>
</head>
<body>
    <h1>Child</h1>
    <p>
        <input type= "text" id="childValue">
        <input type= "button" value="send window" onclick="sendVal()">
    </p>
    <script>
        // value 속성 -> 태그에 있는 정보를 가지고 온다
        // childValue의 값을 가지고 올 수 있다
        // 부모의 값을 자식이 가지고 온다
        document.getElementById("childValue").value = window.opener.document.getElementById("ParentValue").value;

        // 자식의 값을 부모에게 넘겨준다
        function sendVal() {
            window.opener.document.getElementById("ParentValue").value = document.getElementById("childValue").value;
            window.close();
        }
    </script>
</body>
</html>
→ 부모창에서 자식창에게 값을 전달

→ 자식창에서 부모창에게 값 전달
+그밖의 객체들
// setInterval() : 일정 시간의 간격을 두고 무한 반복
// clearInterval() : 중단시키고 싶을 떄

// setTimeout() : 일정 시간 이후 한번만 실행
// clearTimeout() : 중단시키고 싶을 떄

// location 객체
// href 속성 : 특정 url로 이동
// reload() : 페이지 새로 고침

// history 객체
// back(), forword(), go(-3)점프하기
setInterval() : 일정 시간의 간격을 두고 무한 반복
clearInterval() : 중단시키고 싶을 떄

예제 )

<script>
        let addNum = 0;
        let subNum = 100;

        // setInterval(함수, 시간간격) 시간간격을 기준으로 함수가 작동

        let auto1 = setInterval(function(){
            addNum++;
            console.log("addNum : " + addNum);
        }, 3000);

        let auto2 = setInterval(function(){
            subNum--;
            console.log("subNum : " + subNum);
        }, 3000)

    </script>
</head>
<body>
    <button onclick="clearInterval(auto1)">증가 정지</button>
    <button onclick="clearInterval(auto2)">감소 정지</button>
</body>
 location 객체
 href 속성 : 특정 url로 이동
 reload() : 페이지 새로 고침

예제 )

<script>
        // let url = prompt("사이트주소 입력 ", "");
        // location.href = url;

        //  //함수로 묶으면 호출하기 전까지 실행되지 않는다
        // function site() {
        //     location.href = "http://www.google.com";
        // }

        let auto = setInterval(function(){
            location.reload();
        }, 1000);   // 페이지 새로 고침 1초에 한번씩 발생

    </script>
</head>
<body>
    location 객체 테스트
    <!-- 스크립트를 헤더에 넣느냐, 바디에 넣느냐에 따라 실행 시간의 차이 -->

    <!-- <button onclick="site()">사이트 이동</button> -->
</body>
 history 객체
 back(), forword(), go(-3)점프하기

 예제 )

 <script>
        function backs(){  // back은 새로고침
            history.back();
        }

        function forwords(){  // forwords는 새로 고침 X
            history.forward();
        }

    </script>
</head>
<body>
    <button onclick="backs()">이전 가기</button>
    <button onclick="forwords()">다음 가기</button>
</body>
배운 게 너무 많으면 자주 쓰이는 기능이라도 검색해서 연습해봐라
자바스크립트 자주 쓰이는 Array 기능
[JavaScript] 자주 쓰는 10가지 Array 함수 정리
JavaScript 자주 쓰는 Array 함수 10가지 정리
velog.io
함수 작성 방식
        // 함수 생성(작성) 방식
        // 1. 명명 함수
        // 2. 익명 함수
        // 3. 변수를 사용한 명명 함수
        // 4. 즉시 실행 함수
        // 5. 화살표 함수


        // 1번 형식으로 만든 함수들
        function add() {
            document.write(2 + 3 + "<br>");
        }

        add();

        function add2(x, y) {
            document.write(x + y + "<br>");
        }

        add2(3, 4);

        function add3(x, y) {
            let sum = x + y;
            return sum;
        }

        document.write(add3(10, 20));   // 이 자체가 sum 이 된다

        function add4(x) {
            if (x === 10){
                return;  // 매서드의 종료 : return
            }
            document.write(x);
        }
// 2. 익명함수 형식 = 콜백함수
// setInter 에서 써봤다!
// 변수명을 가지고 이름으로 사용한다
let anadd = function(){
document.write("hello" + "<br>");
}
anadd();
// 4. 즉시 실행 함수
(function(){
document.write("즉시실행함수" + "<br>"); // 호출 없이 즉시 실행
})()
(function(x, y){
document.write(x + "," + y + "<br>");
document.write("즉시실행함수" + "<br>");
})(10, 20)
// 5. 화살표 함수
//() => document.write("화살표 함수"); // 이 자체로는 활용할 방법이 없음
let arrow = () => document.write("화살표 함수"); // 이름을 받아 사용
arrow();
함수의 스코프
        스코프(Scope)
        // 함수의 호출 특징
        // 호이스팅 -> 함수를 만드는 위치 (선언위치와 호출위치의 관계)
        // 호이스팅 뜻은 낚시바늘 , 함수의 선언 , 코드의 실행 위에서 부터 아래 , 함수가 만들어져 있어야 함
        // 함수의 선언위치 밑에 호출 함수가 와야하는데 호출이 먼저 발생했다 -> ?
        // 그럼 함수가 없는 상태에서 실행되는 것 -> 오류가 발생함
        // 그 오류를 방지하기 위해 낚시바늘로 선언 함수를 가지고 오는 것 -> 함수의 호이스팅이라고 함

        // 함수의 호이스팅 가능

         add2();

          function add2(x, y) {
              document.write(x + y + "<br>");
              // nan -> x, y를 선언하지 않았기 때문에 nan이 나옴
          }


        // 익명함수의 호이스팅 불가능

         anadd();

         let anadd = function(){
             document.write("hello");
         }


 ----------------------------------------------------------------------------

        // 변수 스코프
        // 1. var : 함수 레벨 스코프

         function func() {
             if (true) {
                 var a = 5;
                 console.log(a)
              }
             console.log(a)
         }

         func();
         console.log(a)  // 에러 : a is not defined at function.html:112:21


        // 2. let, const : 블록레벨스코프

        function func() {
            if (true) {
                let a = 5;  // 특정블록에서만 유효한 지역변수
                console.log(a)
             }
            console.log(a)  // 에러 a라는 변수가 없다
        }

        func();


        변수의 호이스팅
        // var 타입은 호이스팅이 가능 -> 빚을 지는 거라고 생각하면 됨
        // -> 불안정, 호이스팅을 많이 하는 것이 좋은 것이 아님

        console.log(a)
        var a = 5;  // 미리 할당이 되어있지만 값이 없는 것 undefined

        // let, const 타입은 호이스팅이 불가능

        console.log(b)
        let b = 5;  // 만든 후에 사용하는 것이 안정정
함수를 알면 사용자 정의 객체를 만들 수 있다.
사용자 정의 객체
 사용자 정의 객체 만드는 방법

            // 1번째 방식, 함수형 객체 -> 생성해서 사용한다
             function CheckWeight(name, height, weight) {
                 this.userName = name;
                 this.userHeight = height;
                 this.userWeight = weight;

                 this.getInfo = function(){
                     let str = "";
                     str += "이름 : " + this.userName + ",";
                     str += "키 : " + this.userHeight + ",";
                     str += "몸무게 : " + this.userWeight + ",";

                     return str;
                 }
             }

             let kim = new CheckWeight("장보리", 160 , 62);
             console.log(kim);
             console.log(kim.userName);  // 함수에서 정보를 가지고 오는 방법
             console.log(kim.getInfo());


-------------------------------------------------------------------------


            // 2번째 방식 -> let obj = {}
            // 생성없이 사용한다
            // 참조타입
            let obj = {    // let obj = [] 배열
                cat: "meow",
                dog: "woof",

                animal: function() {
                    return "현재 동물은" + this.dog + "와" + this.cat + "가 있습니다.";
                }
            }
            console.log(obj.cat);
console.log(obj.animal());'2024_UIUX 국비 TIL' 카테고리의 다른 글
| UIUX _국비과정 0429 [제이쿼리 입문] (1) | 2024.06.04 |
|---|---|
| UIUX _국비과정 0426 (0) | 2024.06.03 |
| UIUX _국비과정 0424 (1) | 2024.06.03 |
| UIUX _국비과정 0423 [에어비앤비 클론 코딩 + 자바스크립트 입문] (0) | 2024.05.30 |
| UIUX _국비과정 0422 (0) | 2024.05.30 |