작성 : 2024. 4. 18.
선택자들
- 하위선택자
 div p,h1 {
            color: blue;
        }

       div h1 {
            color: blueviolet;
        }

       div p {
            color: rgb(200, 78, 169);
        }
- 자식선택자
	div > p,h1 {
                color: rgb(53, 152, 79);
            }
- 인접선택자
            /* 첫번째 동생찾기 */
            h1 + p {
                color: chartreuse;
            }

            /* 동생들 찾기 */
            h1 ~ p {
                color: cornflowerblue;
            }
- 속성선택자
      		a[href] {
                color: rgb(241, 72, 72);
            }

            a[target="_blank"] {
                color: rgb(229, 142, 202);
            }

            [class ~= "button"] {
                color: rgb(103, 150, 207);
            }

            /* '속성의 이름이 eng로 시작하는' 이라는 의미 */
            a[title ^= "eng"] {
                color: cadetblue;
            }

            /* '속성의 이름이 ese로 끝나는' 이라는 의미 */
            a[title $= "ese"] {
                color: red;
            }

            /* '속성의 이름에 e가 들어가는' 이라는 의미 */
            a[title *= "e"] {
                color: darksalmon;
            }
- 가상선택자
			/* 가상클래스와 가상요소 */
            /* 이것을 사용하지 않으면 해결하기 쉽지않은 것들이 있어 잘 알아둬야 함. */
            a:link{
                text-decoration: none;
            }
            /* 가상선택자 hover */
            a:hover{
                text-decoration: underline;
            }

            a:active{
                color: aqua;
            }

            a:visited{
                color: darkgray;
            }

            p:hover{
                color: rgb(61, 165, 130);
            }

            ul li input:checked + label{
                color: gold;
            }
- 구조선택자에 대해서
            /* 구조선택자 */
            /* 특정위치에 있는 요소(태그)를 찾는 방법 */
            /* 특정위치에 자식요소 선택자를 찾는 방법 */
            .contents :nth-child(3) {
                color: cadetblue;
            }

            .contents p:nth-of-type(3) {
                color: rgb(26, 215, 26);
            }

            ul li{
                list-style-type: none;
                float: left;
            }

            /* 예를 들어 짝수만 선택해서 디자인해야한다 했을 때 구조를 이용해 선택할 수 있는 방법 */
            ul li:nth-child(2n) {
                background-color: blue;
            }

            ul li:nth-child(2n+1) {
                background-color: rgb(160, 160, 248);
            }
- 구조선택자
코드 :
<!DOCTYPE html>
<html lang="ko">
    <head>
        <meta charset="UTF-8">
        <title>가상 요소</title>
        <style>
            .container {
                width: 960px;
                margin: 0 auto;
            }
            ul li {
                margin: 15px;
            }

            li.new2::after {
                content: "NEW!!";
                font-size: x-small;
                padding: 2px 4px;
                margin: 0 10px;
                border-radius: 2px;
                background: #f00;
                color: #fff;
            }

            /* li.new에 이런 내용이 있으면 after를 적용해라 */
            li.new::before {
                content: "NEW!!";
                font-size: x-small;
                padding: 2px 4px;
                margin: 0 10px;
                border-radius: 2px;
                background: #f00;
                color: #fff;
            }

        </style>
    </head>

    <body>
        <div class="container">
            <h1>제품 목록</h1>
            <ul>
                <li class="new">제품 A</li>
                <li class="new2">제품 B</li>
                <li class="new2">제품 C</li>
                <li class="new">제품 D</li>
            </ul>
        </div>
    </body>
</html>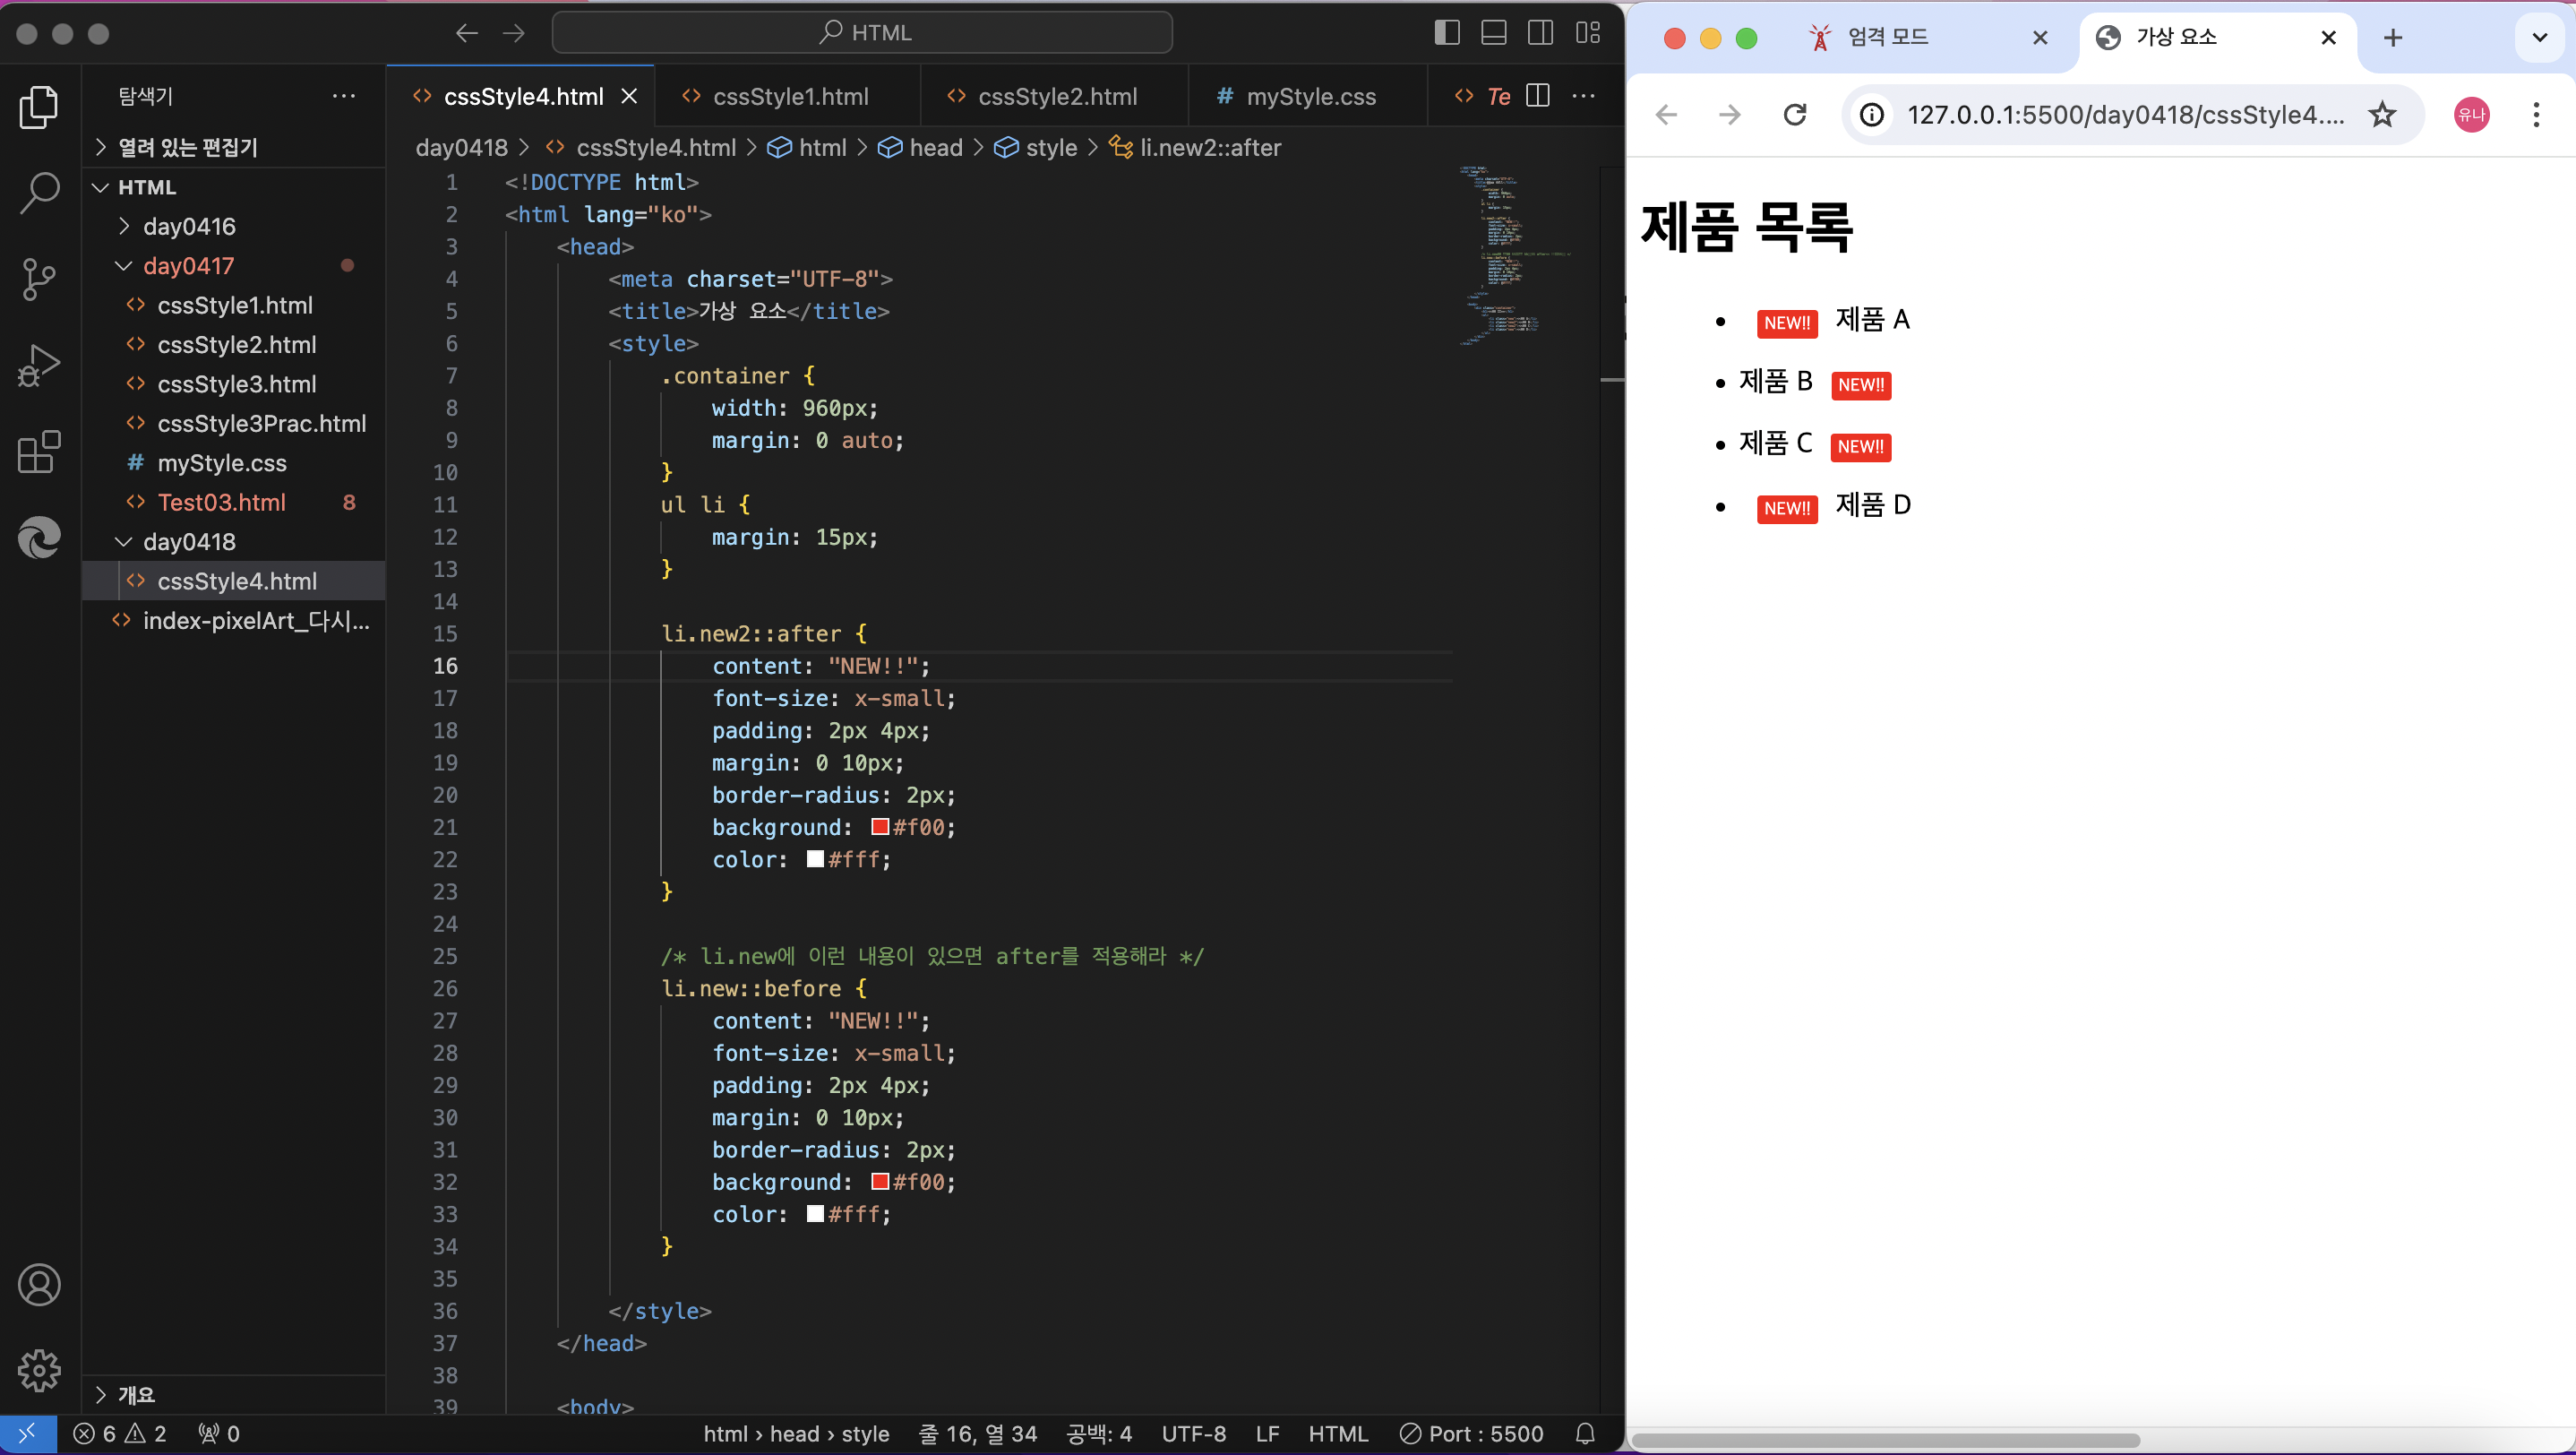
폰트 속성에 대하여
CSS는 단위를 붙여주지 않으면 실행이 안됨!
<!DOCTYPE html>
<html lang="en">
    <head>
        <meta charset="UTF-8">
        <meta name="viewport" content="width=device-width, initial-scale=1.0">
        <title>font 속성</title>
        <link rel="preconnect" href="https://fonts.googleapis.com">
        <link
            rel="preconnect"
            href="https://fonts.gstatic.com"
            crossorigin="crossorigin">
        <link
            href="https://fonts.googleapis.com/css2?family=Kirang+Haerang&display=swap"
            rel="stylesheet">
        <style>

            body {
                /* 절대크기 : px, pt */
                /* 상대크기 : %, em */
                font-size: 24px;
            }

            h1 {
                /* 색 지정 방식 4가지
                1. 직접 색을 넣어주기
                2. 16진수 표기법
                3. rgb()함수 사용법
                4. rgma() rgv에 투명도 추가   */
                font-family: Arial, Helvetica, sans-serif;
                /* color: rgb(186, 99, 206); */
                /* color:#86E57F */
                color:rgb(94, 163, 107,0.4);
                /* 레드, 그린, 블루, 투명도 */
            }

            p {
                font-weight: bold;
                font-style: italic;

            }

            .kirang-haerang-regular {
                font-family: "Kirang Haerang", system-ui;
                font-weight: 400;
                font-style: normal;
            }

            h2 {
                font-family: "Kirang Haerang", system-ui;
                font-weight: 400;
                font-style: normal;
            }
        </style>
    </head>
    <body>
        <h1>폰트를 넣고, 다루는 법</h1>
        <p>이걸 웹폰트라고 합니다</p>
        <h2>어디에서나 동일한 글씨체로 볼 수 있어요</h2>
        <h2 class="kirang-haerang-regular">클래스명을 글꼴명으로 바꾸기</h2>
    </body>
</html>
<!DOCTYPE html>
<html lang="en">
<head>
    <meta charset="UTF-8">
    <meta name="viewport" content="width=device-width, initial-scale=1.0">
    <title>Document</title>
    <style>
        .link1 {
            text-decoration: none;
        }
        .link2 {
            text-decoration:overline;
        }
        .link3 {
            text-decoration:line-through;
        }
        .link4 {
            text-decoration:underline;
        }

    </style>
</head>
<body>
    <a href="http://WWW.naver.com" class="link1">밑줄선을 없애준다</a><br>
    <a href="http://WWW.naver.com" class="link2">글씨위에 선을 긋는다</a><br>
    <a href="http://WWW.naver.com" class="link3">글씨에 선을 관통한다</a><br>
    <a href="http://WWW.naver.com" class="link4">밑줄선을 긋는다</a><br>
</body>
</html>
- 목록의 모양 바꾸기
        ul {
            /* 목록의 모양을 없애는 태그 */
            list-style-type:none;
        }

        ol {
            /* 목록의 모양을 지정하는 태그 */
            list-style-type:lower-roman;
        }
- 테이블을 꾸미는 방법
table,td {
            border: 1px solid blue;/* border: 굵기, 선종류, 선의 색깔; */
            width: 250px;
            height: 80px;
            border-collapse: collapse;
            caption-side: bottom;
        }
디자인 연습에 들어가기 앞서,
디자인 할 때 큰 클을 먼저 잡아두고, 디자인에 들어가야 함.
내용 → 코드분석 → 크기 → 정렬 등 배치가 끝나는 것이 첫 번째!
- 디자인 연습문제
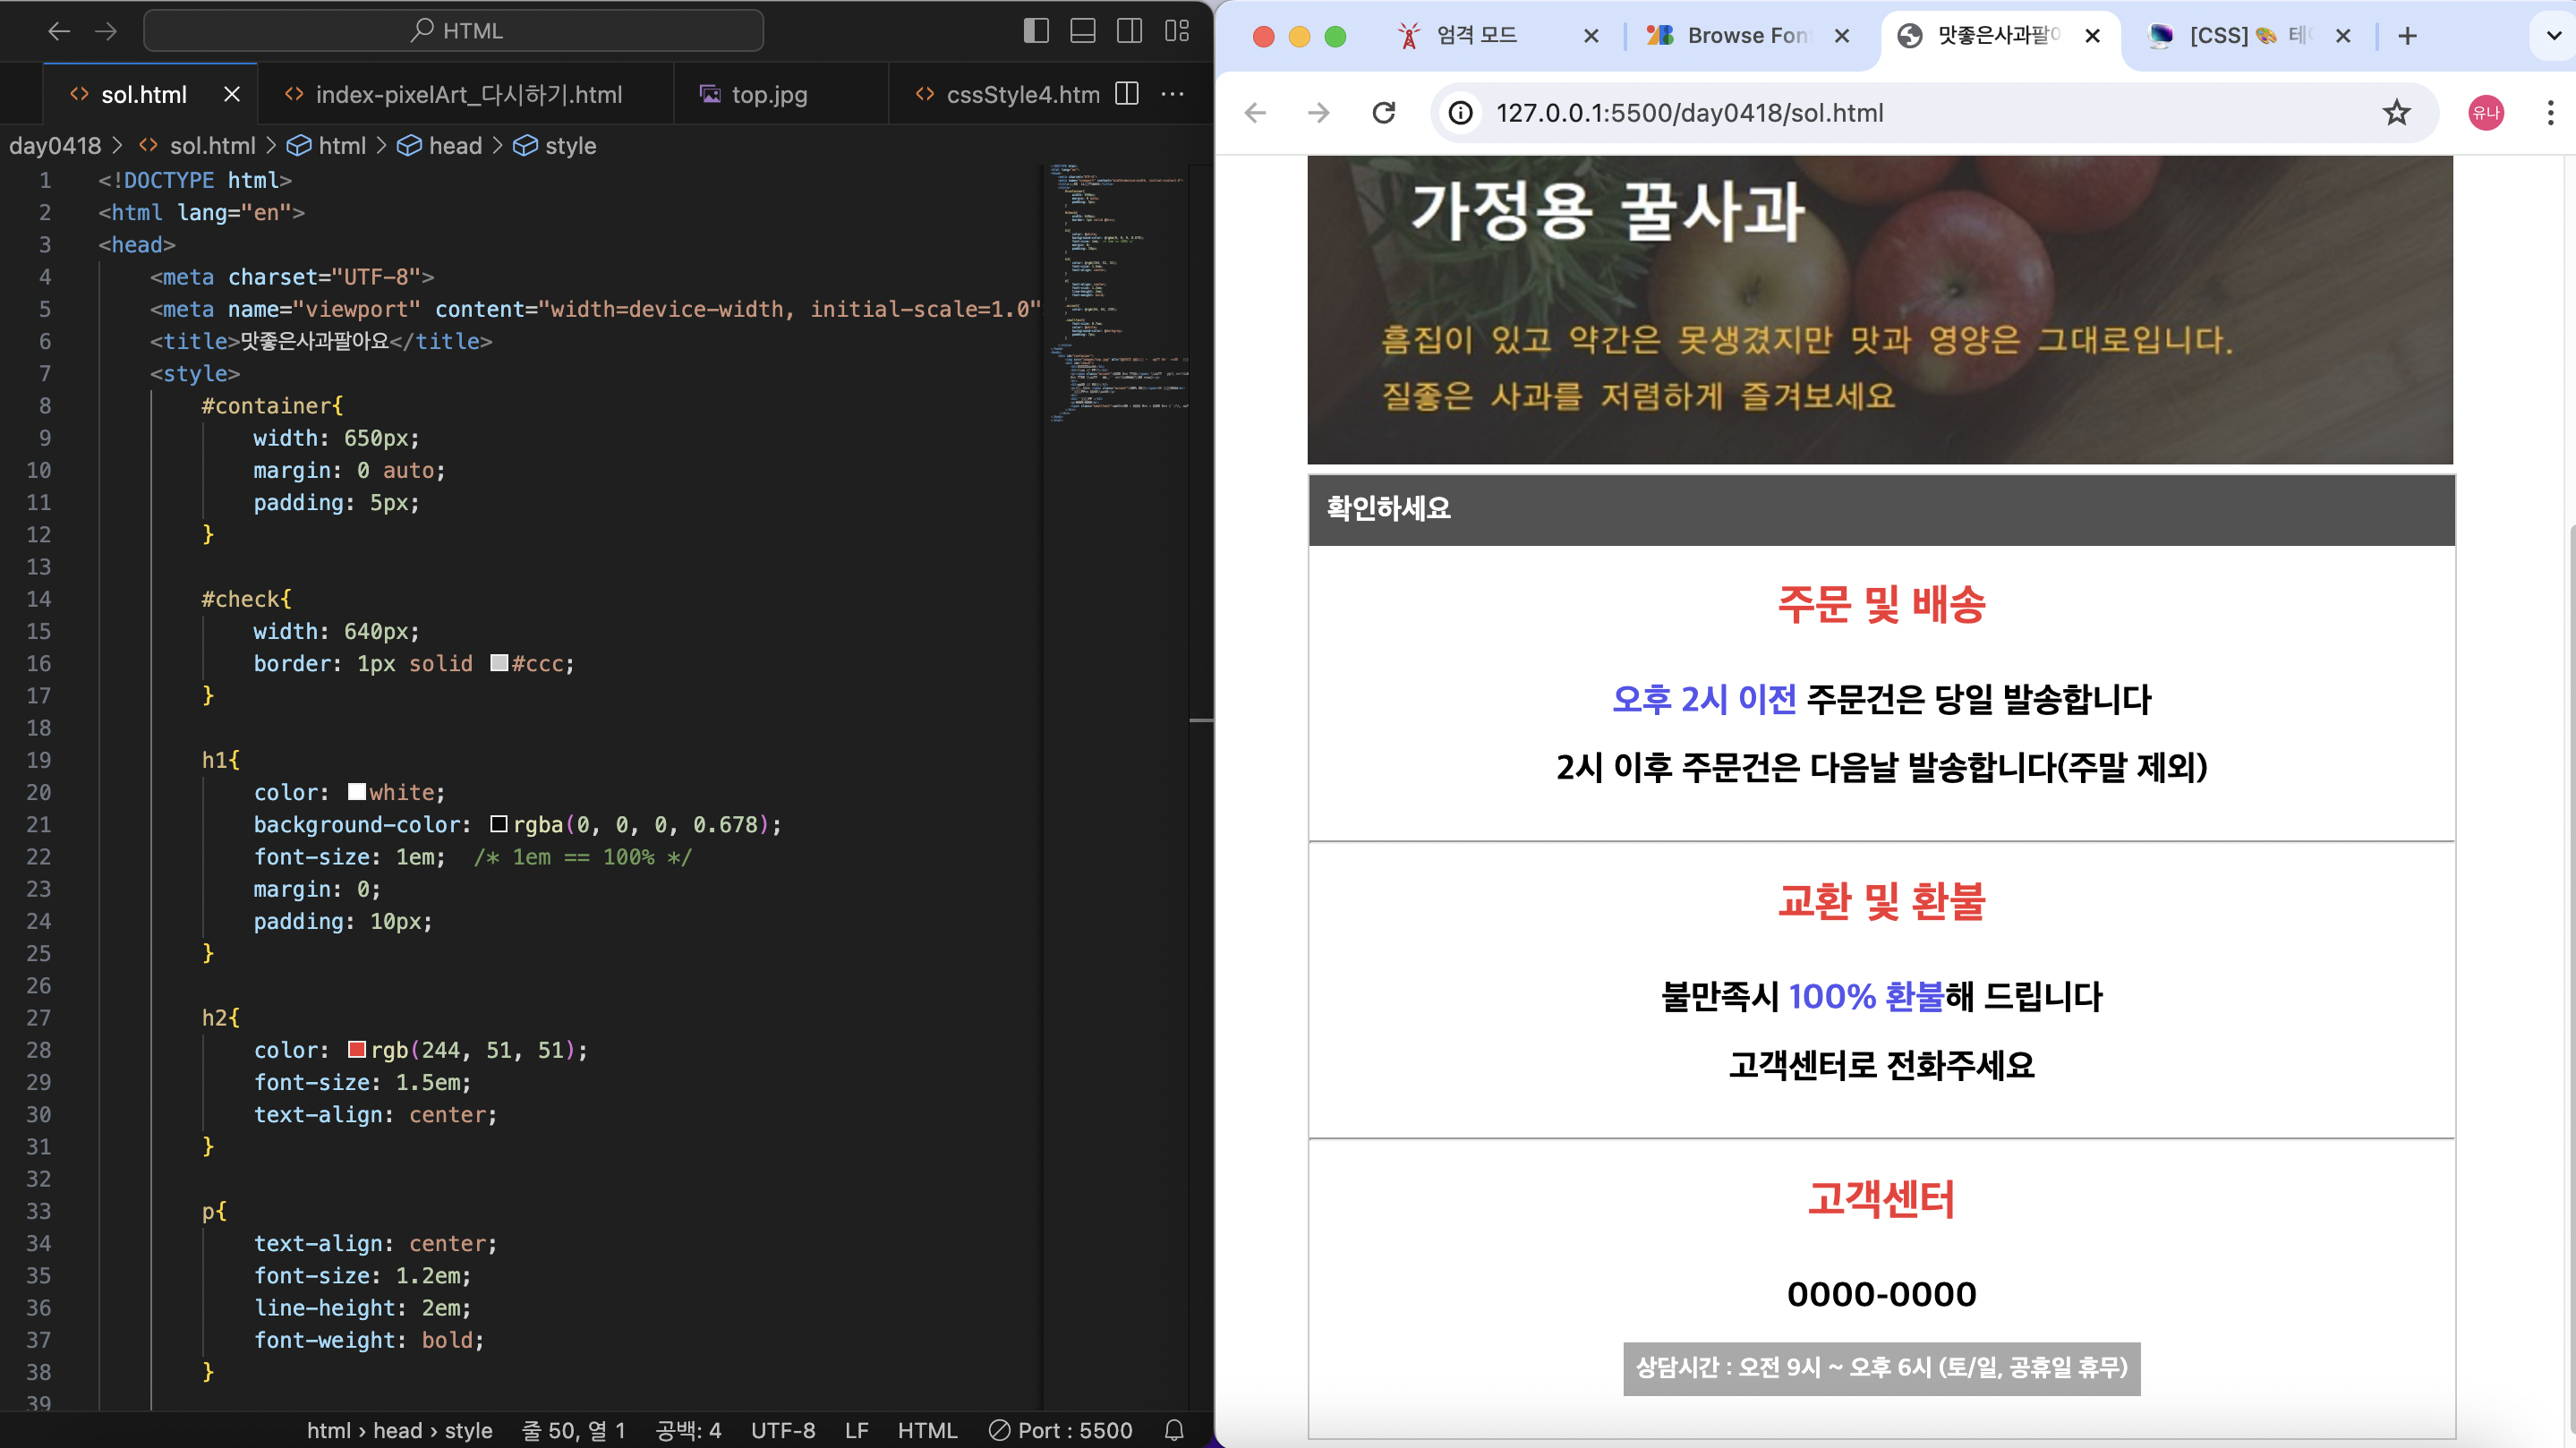
<!DOCTYPE html>
<html lang="en">
<head>
    <meta charset="UTF-8">
    <meta name="viewport" content="width=device-width, initial-scale=1.0">
    <title>맛좋은사과팔아요</title>
    <style>
        #container{
            width: 650px;
            margin: 0 auto;
            padding: 5px;
        }

        #check{
            width: 640px;
            border: 1px solid #ccc;
        }

        h1{
            color: white;
            background-color: rgba(0, 0, 0, 0.678);
            font-size: 1em;  /* 1em == 100% */
            margin: 0;
            padding: 10px;
        }

        h2{
            color: rgb(244, 51, 51);
            font-size: 1.5em;
            text-align: center;
        }

        p{
            text-align: center;
            font-size: 1.2em;
            line-height: 2em;
            font-weight: bold;
        }

        .accent{
            color: rgb(84, 84, 239);
        }

        .smalltext{
            font-size: 0.7em;
            color: white;
            background-color: darkgray;
            padding: 7px;
        }

    </style>
</head>
<body>
    <div id="container">
        <img src="images/top.jpg" alt="가정용 꿀사과 - 흠집이 있고 약간은 못생겼지만 맛과 영양은 그대로입니다. 질좋은 사과를 저렴하게 즐겨보세요">
        <div id="check">
           <h1>확인하세요</h1>
           <h2>주문 및 배송</h2>
           <p><span class="accent">오후 2시 이전</span> 주문건은 당일 발송합니다<br>
           2시 이후 주문건은 다음날 발송합니다(주말 제외)</p>
           <hr>
           <h2>교환 및 환불</h2>
           <p>불만족시 <span class="accent">100% 환불</span>해 드립니다<br>
           고객센터로 전화주세요</p>
           <hr>
           <h2>고객센터 </h2>
           <p>0000-0000<br>
           <span class="smalltext">상담시간 : 오전 9시 ~ 오후 6시 (토/일, 공휴일 휴무)</span></p>
        </div>
     </div>
</body>
</html>
- 박스모델에 대하여
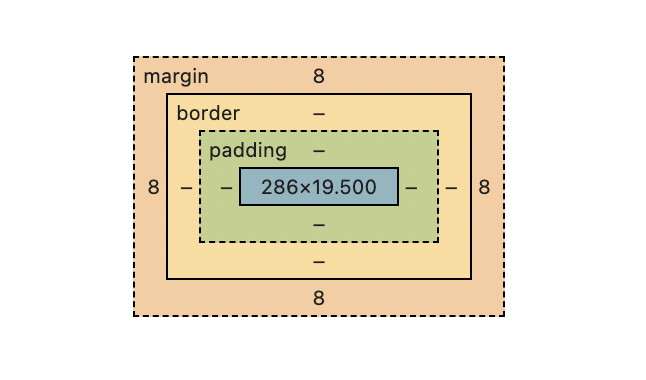
높이는 height
width 와 height → 기본 콘텐츠값
박스에 대해 알아보기 위해 여러 박스를 만들었다.
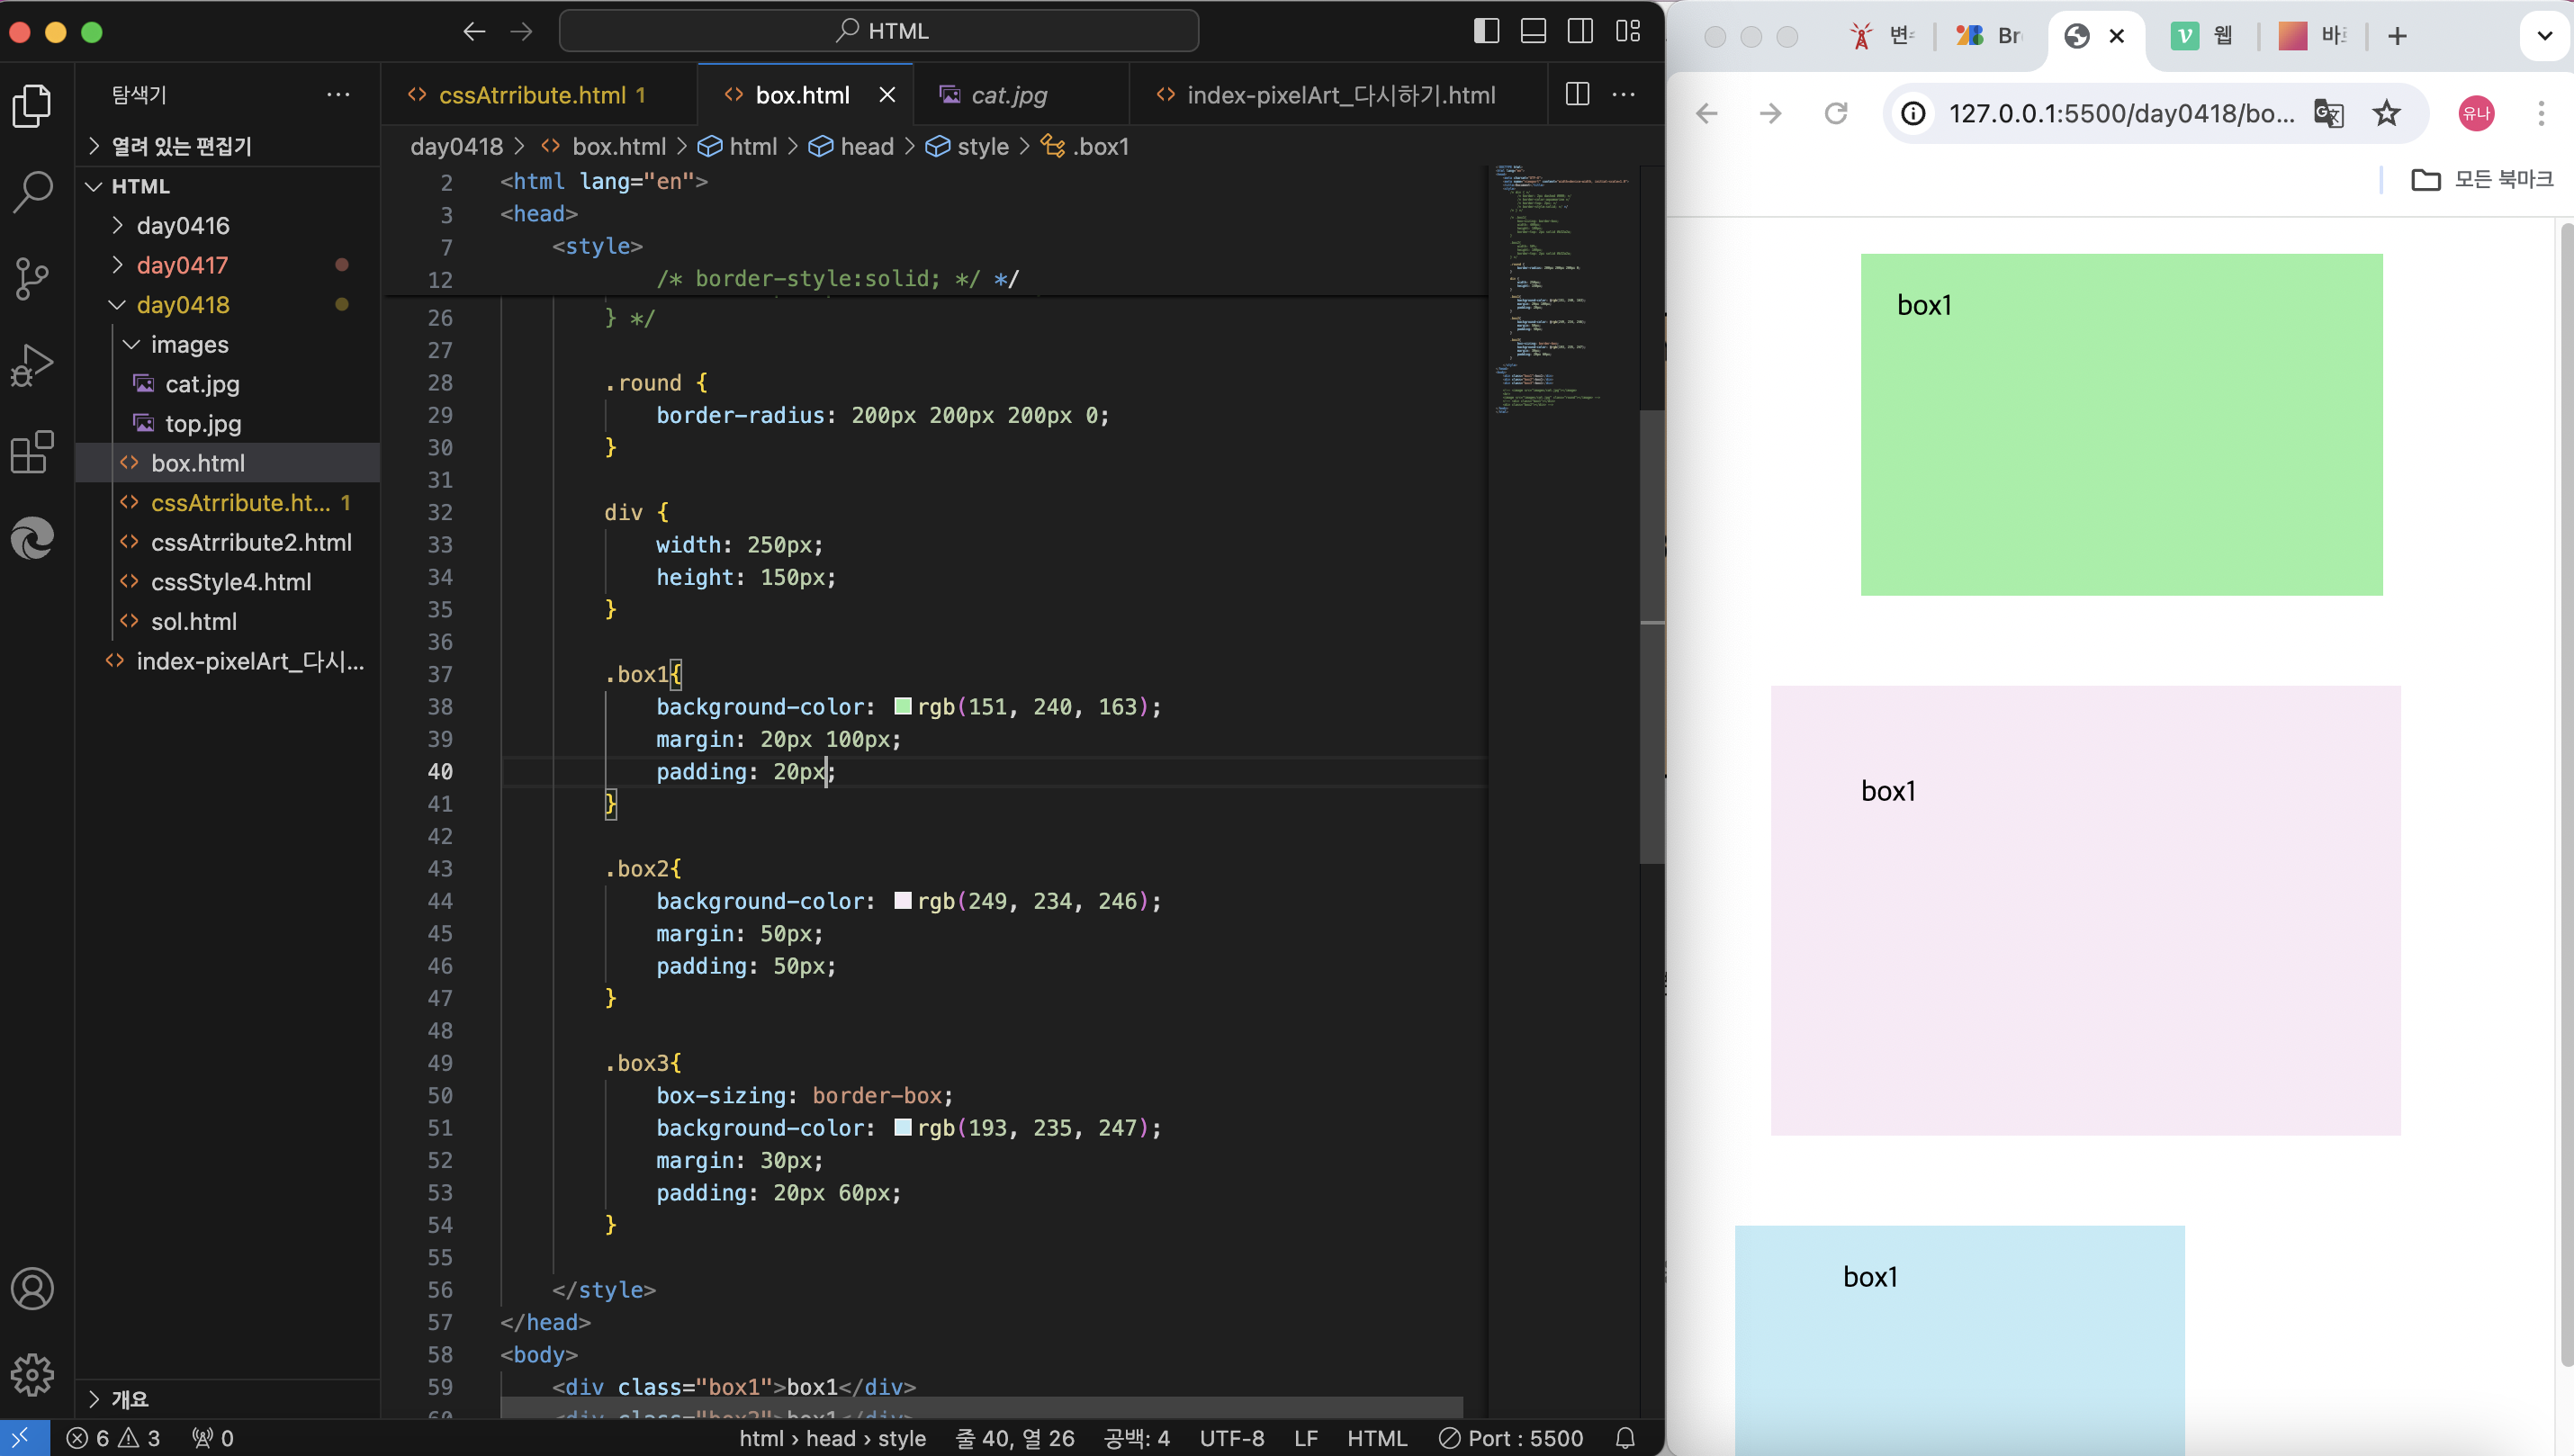
<!DOCTYPE html>
<html lang="en">
<head>
    <meta charset="UTF-8">
    <meta name="viewport" content="width=device-width, initial-scale=1.0">
    <title>Document</title>
    <style>
        /* div { */
            /* border: 2px dashed #000; */
            /* border-color:aquamarine */
            /* border-top: 2px; */
            /* border-style:solid; */ */
        /* } */

        /* .box1{
            box-sizing: border-box;
            width: 400px;
            height: 100px;
            border-top: 2px solid #b32a2a;
        }

        .box2{
            width: 50%;
            height: 100px;
            border-top: 2px solid #b32a2a;
        } */

        /* .round {
            border-radius: 200px 200px 200px 0;
        } */

        div {
            width: 250px;
            height: 150px;
        }

        .box1{
            background-color: rgb(151, 240, 163);
            margin: 20px 100px;
            padding: 20px;
        }

        .box2{
            background-color: rgb(249, 234, 246);
            margin: 50px;
            padding: 50px;
        }

        .box3{
            box-sizing: border-box;
            background-color: rgb(193, 235, 247);
            margin: 30px;
            padding: 20px 60px;
        }

    </style>
</head>
<body>
    <div class="box1">box1</div>
    <div class="box2">box1</div>
    <div class="box3">box1</div>

    <!-- <image src="images/cat.jpg"></image>
    <br>
    <image src="images/cat.jpg" class="round"></image> -->
    <!-- <div class="box1"></div>
    <div class="box2"></div> -->
</body>
</html>
display에 대해 알아봅니다
- display 속성과 float
아래 화면은 display 속성에서 인라인과 블록의 차이를 알기 위해 구현해본 것
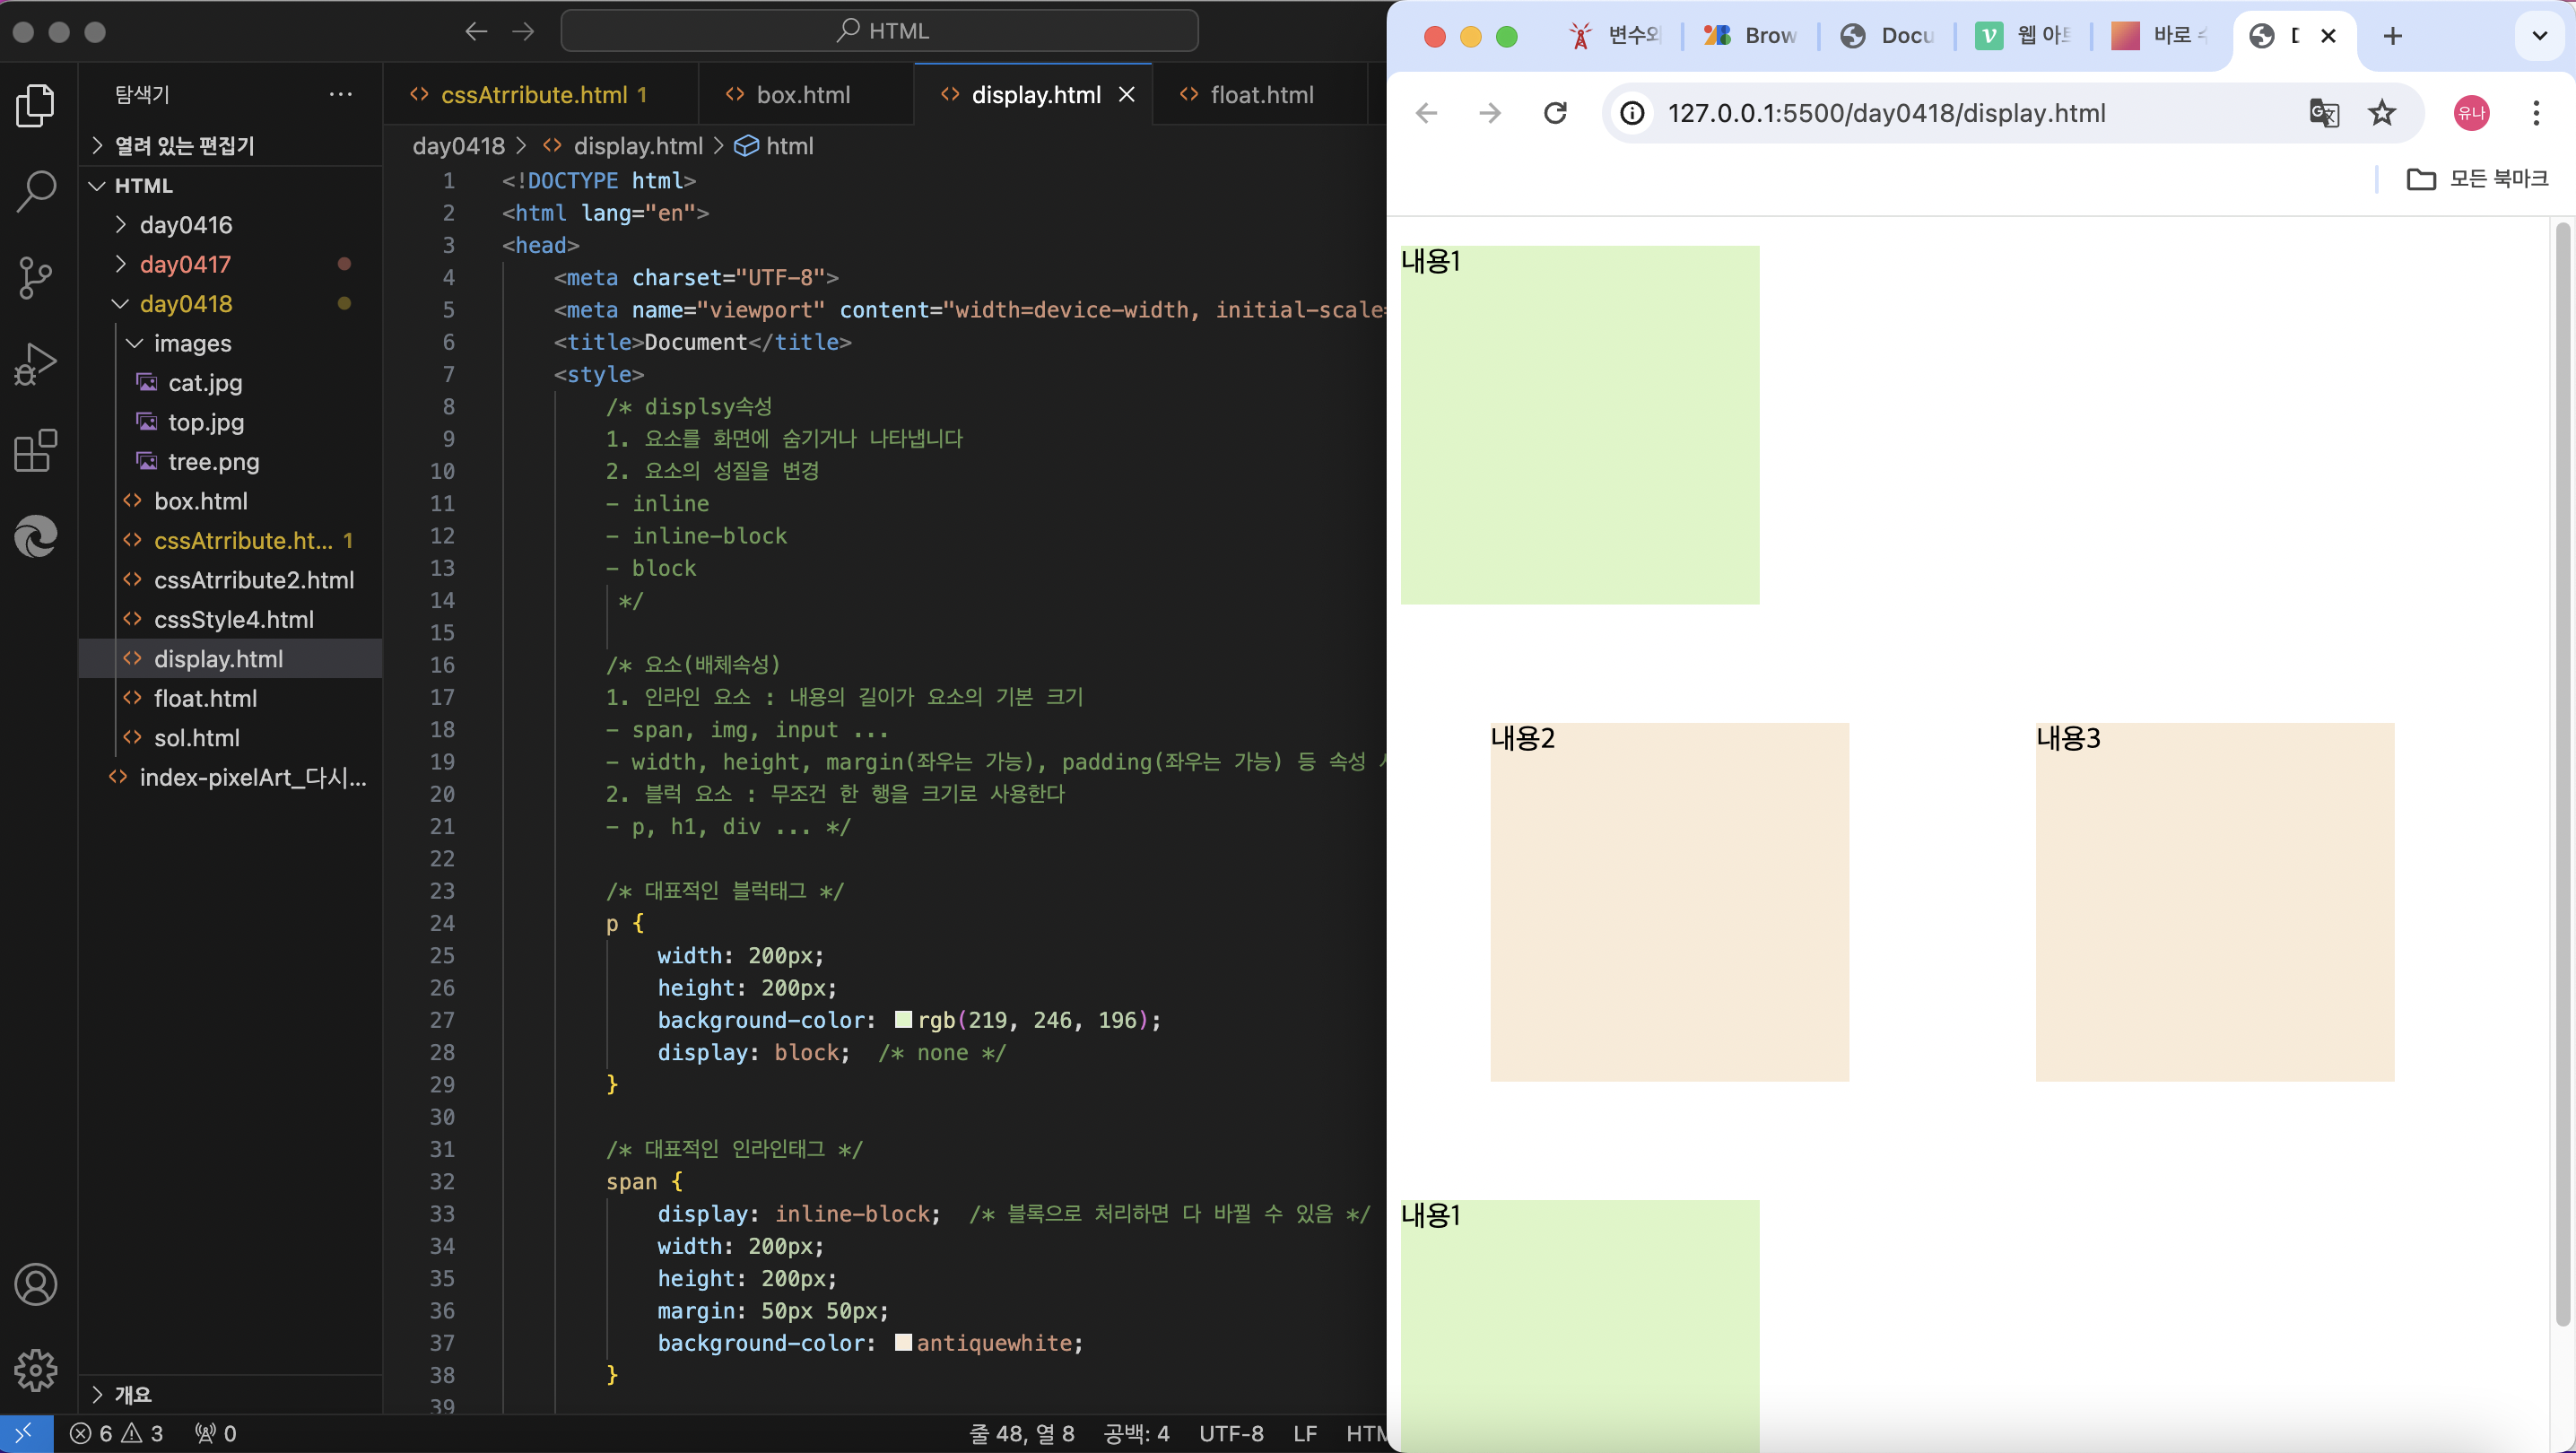
<!DOCTYPE html>
<html lang="en">
<head>
    <meta charset="UTF-8">
    <meta name="viewport" content="width=device-width, initial-scale=1.0">
    <title>Document</title>
    <style>
        /* displsy속성
        1. 요소를 화면에 숨기거나 나타냅니다
        2. 요소의 성질을 변경
        - inline
        - inline-block
        - block
         */

        /* 요소(배체속성)
        1. 인라인 요소 : 내용의 길이가 요소의 기본 크기
        - span, img, input ...
        - width, height, margin(좌우는 가능), padding(좌우는 가능) 등 속성 사용 불가
        2. 블럭 요소 : 무조건 한 행을 크기로 사용한다
        - p, h1, div ... */

        /* 대표적인 블럭태그 */
        p {
            width: 200px;
            height: 200px;
            background-color: rgb(219, 246, 196);
            display: block;  /* none */
        }

        /* 대표적인 인라인태그 */
        span {
            display: inline-block;  /* 블록으로 처리하면 다 바뀔 수 있음 */
            width: 200px;
            height: 200px;
            margin: 50px 50px;
            background-color: antiquewhite;
        }

    </style>
</head>
<body>
    <p>내용1</p>
    <span>내용2</span>
    <span>내용3</span>
    <p>내용1</p>
</body>
</html>
- float 속성
아래는 float 속성을 알기 위한 예제
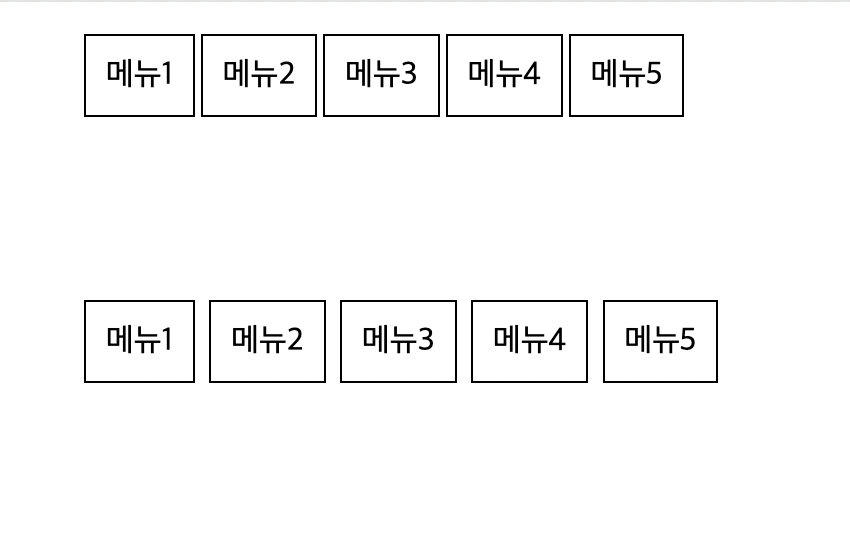
       /* float 속성이란
        - 배치하는 속성
        1. 요소를 왼쪽 또는 오른쪽으로 배치
        - left, right
        2. 인라인하게 만든다
        */

        /* float 속성이 정의한 방향으로 딸려 올라간다. */
        /* 원래 위치를 유지하려고 하면 딸려올라가는 대상에 clear 속성을 사용하자 */
        img{
            float: right;
        }

        p{
            clear: both;
        }

        ul li {
            list-style: none;
            float: left;
            border: 1px solid #000;
            padding: 10px;
            margin: 3px;
        }
홈페이지 구성을 하다 끝남,,
지금 하는 방법은 옛날 방법이라 추가적으로 공부할 필요가 있을 듯,,
포지셔닝에 대해 알아보기
'2024_UIUX 국비 TIL' 카테고리의 다른 글
| UIUX _국비과정 0422 (0) | 2024.05.30 |
|---|---|
| UIUX _국비과정 0419 (0) | 2024.05.30 |
| UIUX _국비과정 0417 [HTML + CSS] (0) | 2024.05.29 |
| UIUX _국비과정 0416 (1) | 2024.05.29 |
| UIUX _국비과정 0415 (0) | 2024.05.29 |